






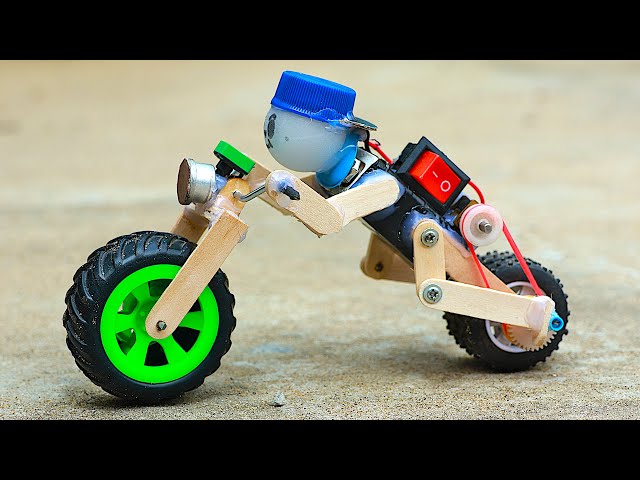
Do you want to create something fun and exciting with your own hands? Making a bike toy is easier than you think, and it’s a great way to enjoy quality time while boosting your creativity.
Imagine the pride you’ll feel when your bike toy comes to life, ready to roll and bring joy. In this guide, you’ll discover simple steps and tips that anyone can follow, even if you’re new to crafting. Ready to turn ordinary materials into a fantastic bike toy?
Let’s get started!
Materials Needed
Gathering the right materials is the first step to making a bike toy that’s both fun and durable. The materials you choose directly affect how your toy performs and how long it lasts. You want to balance quality with ease of use, especially if this is your first time building one.
Think about the tools and supplies you already have at home. Could they work for your project? Sometimes, the best toys come from simple, everyday items you can find around you.
Basic Supplies
- Wood or sturdy cardboard:A strong base is crucial for the bike toy’s frame. Wood offers durability, but cardboard works well for prototypes or lightweight models.
- Wheels:You can use small plastic wheels from old toys or buy new ones from craft stores. Make sure they spin smoothly to keep the toy moving.
- Axles:Thin metal rods or wooden dowels work perfectly to attach the wheels and allow rotation.
- Glue or screws:Depending on your frame material, choose an adhesive that holds firmly. Screws provide extra strength but require a screwdriver.
- Paint or markers:Basic colors to give your toy a neat finish.
Optional Decorations
- Stickers and decals:Add personality with fun shapes or characters that your child loves.
- Colored tape:Easy to apply and remove, tape can create striking patterns or mimic bike details.
- Googly eyes or small beads:These can turn your bike toy into a playful character.
- Ribbon or fabric scraps:Attach these as flags or streamers to make your toy stand out on the move.
What simple material do you have that could make your bike toy unique? Sometimes a small, unexpected item sparks the most creative designs.

Credit: www.youtube.com
Choosing The Right Design
Choosing the right design is key to making a fun and safe bike toy. The design affects how the toy looks, how easy it is to build, and how children will use it. It helps to think about the skill level of the builder and the age of the child who will play with the toy. Picking the right design saves time and keeps everyone happy.
Simple Vs. Complex Models
Simple bike toy designs are easy to build and use fewer parts. They are great for beginners and younger kids. Simple models focus on basic shapes and easy assembly. Complex models have more details and moving parts. They may look more like real bikes and offer more fun features. Complex designs need more skill and time to build. Choose a simple model for quick, easy fun. Pick a complex model if you want a challenge and more realistic toy.
Safety Considerations
Safety is the most important factor in any toy design. Avoid small parts that children can swallow. Use smooth edges and non-toxic materials to prevent injuries. Make sure the toy is stable and will not tip over easily. Check that all parts fit tightly and do not come loose. Test the toy for sharp points or rough surfaces. A safe design protects children and gives parents peace of mind.
Step-by-step Assembly
Assembling a bike toy is a fun and rewarding project. It involves putting together several parts carefully. Following clear steps helps make the process easy and enjoyable.
This section guides you through the main assembly stages. You will build the frame, add wheels, attach handlebars, and finish with final touches. Each step ensures the toy bike is sturdy and safe for play.
Building The Frame
Start by laying out all the frame pieces. Connect the main parts using screws or glue. Make sure the joints are tight and secure. The frame forms the base and supports the whole bike toy. Check for balance and alignment before moving on.
Adding Wheels
Select wheels that fit the frame size. Attach the wheels to the frame’s axle points. Use washers and nuts to hold them firmly. Spin the wheels to test smooth movement. Adjust if the wheels wobble or feel loose.
Attaching Handlebars
Choose handlebars that match the toy bike’s size. Fix them to the frame’s front using screws or clamps. Ensure they are straight and steady. Test by turning the handlebars left and right. They should move freely but stay firm.
Final Touches
Inspect all connections for tightness and stability. Sand any rough edges to prevent splinters or cuts. Paint or decorate the bike toy as desired. Add stickers or designs for a personal touch. Let the paint dry fully before use.
Painting And Decorating
Painting and decorating bring life and personality to your bike toy. This step makes the toy unique and fun to play with. Choosing the right paint and decoration style keeps the toy safe and attractive. Let’s explore safe paint options and creative ideas to make your bike toy stand out.
Safe Paint Options
Use non-toxic paints made for children’s toys. Water-based acrylic paints dry fast and are easy to clean. Look for paints labeled as lead-free and safe for kids. Avoid spray paints indoors to prevent harmful fumes. Always paint in a well-ventilated area. Let the paint dry completely before giving the toy to children. Seal the paint with a clear, child-safe varnish to protect the colors and prevent chipping.
Creative Ideas
- Paint bright colors like red, blue, or yellow for a cheerful look.
- Add stripes, dots, or stars using small brushes or sponges.
- Use stencils to create neat shapes and patterns.
- Decorate with stickers made for children’s toys.
- Glue small, smooth buttons or beads for extra texture.
- Try a two-tone design by painting different parts in contrasting colors.
- Personalize with the child’s name using letter stamps or paint pens.
Tips For Parents
Crafting a bike toy for kids at home can be a fun project. Gather simple materials like cardboard, glue, and paint. Follow easy guides online to create a safe, colorful toy for endless playtime.
Creating a bike toy with your child can be a rewarding adventure. This hands-on activity not only stimulates creativity but also strengthens the bond between you and your little one. As a parent, you play a crucial role in guiding and nurturing your child’s enthusiasm. Here are some practical tips to make the most of this experience.Engaging Kids
Keep your child interested by turning the process into a fun game. You might ask them to pick their favorite colors and materials. Invite them to design a logo or name for the bike—it makes the project feel personal. Use stories to spark their imagination. Share a tale of a famous cyclist or a daring bike adventure. This gives context to the project and makes the toy more meaningful. Listening is key. Pay attention to your child’s ideas, even if they seem outlandish. Encouraging their input fosters a sense of ownership and pride in their creation.Ensuring Safety
Safety should be your top priority. Always use child-friendly materials that are non-toxic and safe for little hands. Make sure any tools or small parts are used under your supervision. This not only prevents accidents but also teaches your child about safe practices. Check the stability of the toy bike once assembled. Give it a gentle push to see if it stands firm. A wobbly toy can be a hazard, so ensure everything is secure before playtime.Encouraging Creativity
Creativity thrives in a supportive environment. Offer a variety of materials like colored paper, stickers, and beads for decoration. Challenge your child to think of how they can make the bike toy unique. Perhaps suggest creating a custom paint job or adding handlebars with a twist. Celebrate their creativity by displaying the finished product prominently in the house. This not only boosts their confidence but also encourages them to take on future projects with enthusiasm. By keeping these tips in mind, you can make the process of building a bike toy both enjoyable and educational. What new skills will your child discover through this creative journey?
Credit: m.youtube.com
Troubleshooting Common Issues
Troubleshooting common issues helps keep your bike toy safe and fun. Simple fixes often solve many problems. Check parts carefully and act quickly to avoid bigger troubles.
Loose Parts
Loose parts can cause the toy to break or become unsafe. Tighten screws with a small screwdriver. Use glue for parts that don’t screw in. Check parts regularly to keep them secure.
Stability Problems
Unstable toys can tip over easily and cause falls. Make sure wheels are properly attached and aligned. Add small rubber pads under the base to stop slipping. Test the bike toy on flat surfaces before play.
Paint Smudges
Paint smudges make the toy look messy. Use a fine brush to fix small spots carefully. Let paint dry in a dust-free place to avoid marks. Clean hands before painting to prevent smudges.
Encouraging Play And Learning
Encouraging play and learning with a homemade bike toy sparks creativity and growth. Kids explore new skills while having fun. This process helps develop their mind and body.
Educational Benefits
Bike toys teach balance and coordination. Children learn cause and effect by moving the toy. It also improves problem-solving skills as they figure out how to use it.
Playing with a bike toy promotes motor skills. It helps strengthen muscles and enhances hand-eye coordination. Kids also practice patience and focus during playtime.
Interactive Play Ideas
- Create obstacle courses to navigate with the bike toy.
- Organize races to encourage friendly competition and speed control.
- Use the toy to teach traffic rules and safety basics.
- Combine storytelling with play to boost imagination and language skills.
- Invite friends for group play to develop social interaction.

Credit: www.youtube.com
Frequently Asked Questions
What Materials Are Needed To Make A Bike Toy?
To make a bike toy, you need plastic, wood, screws, paint, and glue. These materials are safe and easy to handle. Using lightweight materials ensures the toy is easy to play with and durable.
How Long Does It Take To Make A Bike Toy?
Making a bike toy typically takes 1 to 2 hours. This depends on the complexity and drying time for glue or paint. Planning and preparation can speed up the process.
Can Kids Safely Make A Bike Toy At Home?
Yes, kids can safely make a bike toy with adult supervision. Use child-friendly tools and non-toxic materials. Safety ensures a fun and educational crafting experience.
What Skills Are Learned From Making A Bike Toy?
Making a bike toy teaches creativity, hand-eye coordination, and basic crafting skills. It also improves patience and problem-solving abilities, making it a valuable activity for children.
Conclusion
Making a bike toy is fun and simple. You only need basic materials and a little time. Follow the steps carefully and enjoy the process. Creating your own toy helps you learn and be creative. It also brings joy to kids and adults alike.
Try different designs to find what you like best. Keep practicing, and your skills will improve. Making toys by hand feels rewarding and special. Give it a go and have fun building your bike toy!