



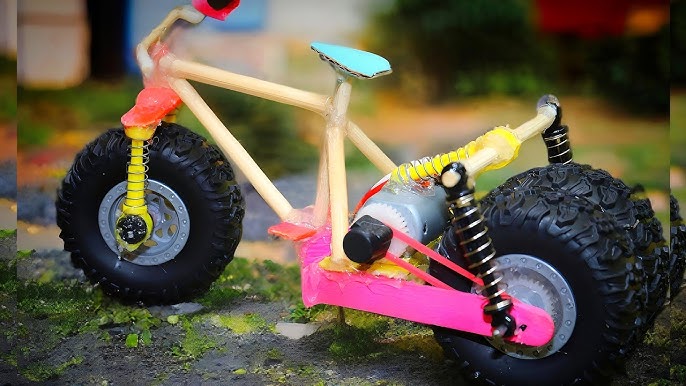
Have you ever wanted to build something fun and exciting with your own hands? Making an electric bike toy is easier than you think, and it’s a perfect project for you to enjoy creativity while learning new skills.
Imagine the thrill of riding a bike you built yourself, powered by a small electric motor. In this guide, you’ll discover simple steps to turn ordinary parts into a cool electric bike toy. Ready to impress your friends and feel proud of your creation?
Let’s get started!
Materials Needed
Gathering the right materials is crucial before you start building your electric bike toy. Having everything at hand keeps the process smooth and enjoyable. It also helps you avoid frustrating pauses searching for missing parts or tools.
Basic Components
- Electric Motor:The heart of your bike toy, choose a small motor with suitable power for your design.
- Battery:A rechargeable battery pack, such as a lithium-ion cell, provides the needed energy.
- Frame:Use lightweight materials like plastic or thin wood to form the bike’s body.
- Wheels:Small plastic or rubber wheels that fit your frame size.
- Wiring:Thin insulated wires to connect the motor and battery.
- Switch:A simple on/off switch to control the motor.
- Gears or Pulleys:Optional, to transfer motor power to wheels efficiently.
Tools Required
- Screwdriver Set:Essential for fastening parts securely.
- Soldering Iron:Helps you connect wires firmly and ensures reliable electrical contacts.
- Wire Strippers:Makes it easy to remove insulation without damaging wires.
- Hot Glue Gun:Useful for quick bonding of components without screws.
- Small Pliers:Handy for bending wires and holding small parts in place.
- Multimeter:Checks voltage and continuity, preventing electrical issues.
Safety Gear
- Safety Glasses:Protect your eyes during soldering or cutting.
- Heat-Resistant Gloves:Avoid burns when handling the soldering iron or hot glue gun.
- Well-Ventilated Area:Ensure good airflow to avoid inhaling fumes from solder or glue.
- Fire Extinguisher:Keep nearby just in case of accidental sparks or overheating.
Have you checked your workspace for all these items before starting? Missing even one small tool or safety item can slow you down or cause accidents. Preparing thoroughly gives you confidence and lets your creativity flow without interruption.
Choosing The Right Motor
Choosing the right motor is a crucial step when making your own electric bike toy. The motor determines how fast and powerful your bike will be, directly impacting the fun and functionality. Understanding the types of motors and matching their power with your speed needs will help you build a toy that performs just the way you want.
Types Of Motors
There are several motor types to consider for your electric bike toy, each with its strengths and weaknesses.
- Brushed Motors:Simple and affordable, these motors are easy to control but wear out faster due to brushes inside.
- Brushless Motors (BLDC):More efficient and durable, they offer better performance and require less maintenance.
- Geared Motors:These provide more torque, making them great for climbing or carrying heavier loads.
- Direct Drive Motors:Known for smooth operation and quiet rides, but usually larger and heavier.
Think about your bike’s purpose—do you want speed, power, or a balance? Your choice of motor will shape that experience.
Power And Speed Considerations
Power is measured in watts, and it directly affects how fast and strong your electric bike toy will be. A motor rated between 100 to 250 watts is usually enough for a small toy bike.
Speed depends on the motor’s RPM (revolutions per minute) and how it connects to the wheels. Higher RPM motors give faster speed but may have less torque.
| Power (Watts) | Typical Speed (mph) | Best Use |
|---|---|---|
| 100 – 150 | 5 – 10 | Lightweight, casual rides |
| 150 – 250 | 10 – 15 | Moderate speed and power |
| 250+ | 15+ | High speed and heavier loads |
Ask yourself: Do you want your bike to be a quick racer or a sturdy cruiser? Your motor choice should reflect that. I once picked a high-powered motor without considering the toy’s weight—it made the bike hard to control. Learning from that, balancing power with speed ensures better handling and more fun.
Building The Frame
Building the frame of your electric bike toy is a crucial step that sets the foundation for everything else. A strong and well-constructed frame ensures safety, durability, and a smooth riding experience. Let’s dive into how you can select the right materials and assemble the base effectively.
Selecting Materials
The material you choose impacts the weight and strength of your bike toy. Steel is a popular choice because it’s strong and easy to weld, but it can be heavy. Aluminum offers a lighter option, though it requires more precise tools to work with.
Consider the age and size of the user when picking materials. For younger kids, lighter materials reduce the risk of accidents. Also, think about availability—can you find scrap metal or repurpose old bike parts? This can save you money and add a unique touch to your project.
Assembling The Base
Start by laying out all your materials on a flat surface. This helps you visualize the frame before you begin attaching parts. Use clamps or temporary fasteners to hold pieces in place while you work.
Welding or bolting the parts together depends on your tools and skills. Bolts are easier for beginners, allowing adjustments as you go. Make sure all joints are tight and secure; a loose frame can make the bike unsafe.
Have you checked if the frame aligns properly? A misaligned frame can affect the balance and steering. Use a level and measure twice before finalizing any connections. Taking time here can save you from major fixes later on.

Credit: www.youtube.com
Wiring The Electronics
Connect the battery, motor, and switch carefully to ensure the toy bike works properly. Use insulated wires and secure all connections tightly. Double-check wiring to avoid shorts and ensure safe operation.
Wiring the electronics of an electric bike toy can be a thrilling part of the build. This stage is where your toy transforms from a static model into a dynamic, functioning piece of technology. You’ll be handling wires, connectors, and components that bring your creation to life. Don’t worry if you’re not an electronics expert; this guide will walk you through each step, ensuring your toy is both fun and functional. Ready to dive in?Connecting The Battery
First, you need to connect the battery. Choose a battery that suits the power requirements of your motor. A 9V battery is often a good choice for small projects. Secure the battery in a holder to keep it stable. Use battery clips to connect the positive and negative terminals. Make sure the connections are snug to prevent any power loss.Installing The Switch
The switch acts as your toy’s ignition. It allows you to control the power flow with a simple flick. Find a spot on your bike where the switch can be easily accessed. Use a soldering iron to attach wires from the battery to the switch. This connection allows you to turn the motor on and off. Test the switch to ensure it works properly before moving on.Attaching The Motor
The motor is the heart of your electric bike toy. Align it with the rear wheel to ensure efficient power transfer. Secure it firmly to prevent it from shifting during operation. Connect the wires from the motor to the switch and battery. Double-check that all connections are tight and secure. Once everything is in place, give your bike a test run. How does it feel to see your creation in action? Remember, patience and precision are key in wiring the electronics. Take your time, and enjoy the process. Each connection you make is a step closer to a working electric bike toy.Adding Wheels And Controls
Adding wheels and controls to your electric bike toy is where the project truly comes to life. This step transforms basic parts into a functional rideable toy that responds to your commands. Paying attention to the right wheels and control setup makes all the difference in how smoothly and safely your toy operates.
Wheel Selection
Choosing the right wheels impacts stability, speed, and comfort. Look for wheels that match the size and weight of your bike toy. Bigger wheels handle rough surfaces better, while smaller wheels offer better maneuverability in tight spaces.
Consider materials too. Rubber wheels provide good grip and shock absorption, which helps if you plan to ride outdoors. Plastic wheels might be cheaper but can slip easily on smooth floors.
Ask yourself: Will your electric bike toy be used mostly indoors or outdoors? This helps decide the wheel type and tread pattern. Don’t forget to check the wheel hub size to ensure it fits your bike’s axle.
Throttle And Steering Setup
The controls bring your electric bike toy under your command. Throttle options include thumb or twist types. Thumb throttles are easier for kids, while twist throttles mimic real bikes and can be more fun.
For steering, a simple handlebar connected to the front wheel works best. Make sure the steering moves smoothly without too much resistance. You want it responsive enough for quick turns but stable enough to avoid wobbling.
Wiring the throttle to the motor controller requires careful attention. Use insulated connectors and secure all wires to prevent loose connections during rides. Have you tested your throttle response in a safe area before taking the toy out for a spin? This can prevent unexpected jerks or stalls.
Testing And Troubleshooting
Testing the electric bike toy ensures all parts work smoothly and safely. Troubleshooting fixes common issues like loose wires or weak battery connections. Check each component carefully to keep the toy running well.
Testing and troubleshooting your electric bike toy is crucial. This step ensures everything works smoothly and safely. Before handing it over to a child, it’s essential to verify its functionality. This section will guide you through the testing phase and help you address any issues that might arise.Initial Test Run
Begin the testing process in a safe, open area. Ensure that all components are securely attached. Check the battery level before the first run. Turn on the power and gently accelerate. Listen for unusual noises and observe the toy’s movement. Does it move straight? Does it respond well to steering? Pay attention to these details during the test.Common Issues And Fixes
Encountering issues during testing is normal. Here are some common problems and their solutions:- Weak acceleration:Check if the battery is fully charged. A weak battery often causes this issue.
- Unstable steering:Ensure the wheels are aligned properly. Tighten any loose bolts.
- Strange noises:Inspect the motor and gears. Clean or lubricate if necessary.
- Power cut-off:Examine the wiring for disconnections. Reattach or replace damaged wires.
Safety Tips For Kids
Making an electric bike toy for kids is a fun project, but safety must always come first. Kids are naturally curious and energetic, so ensuring they play with the toy safely protects them and gives you peace of mind. Let’s look at key safety tips to keep your young riders secure and happy during their adventures.
Supervision Guidelines
Never leave children unsupervised while using the electric bike toy. Even if your kid is familiar with the toy, accidents can happen in a split second. Stay nearby to react quickly if something unexpected occurs.
Set clear rules about where the bike can be used. Keep kids away from busy streets or rough terrain. A flat, open area like a driveway or park is much safer.
Ask yourself: Are you close enough to intervene if your child loses control? Keeping an eye on them helps you teach better riding habits and prevents risky behavior.
Protective Equipment
Protective gear is non-negotiable. Always make sure your child wears a helmet that fits well and meets safety standards. This simple gear can prevent serious head injuries.
Consider additional protection like knee and elbow pads, especially for younger or less steady riders. Gloves can help improve grip and protect small hands during falls.
- Helmet – essential for every ride
- Knee and elbow pads – reduce scrapes and bruises
- Gloves – improve grip and hand protection
Have you checked if your child’s helmet is snug and not past its expiration date? A well-maintained helmet is your best defense against injury.

Credit: m.youtube.com
Customization Ideas
Customization brings personality and fun to your electric bike toy. You can change its look and feel to match your style. Simple changes make your bike unique and exciting. Explore ways to paint, decorate, and upgrade parts easily.
Painting And Decorating
Painting transforms the bike’s appearance quickly. Choose bright or pastel colors for a fresh look. Use spray paint for smooth, even coats. Let each layer dry well before the next.
Decorate with stickers or decals for extra flair. Use waterproof markers for small details. Add reflective tape to improve visibility and safety.
- Mask areas you don’t want to paint
- Use stencils for neat shapes and letters
- Apply a clear coat to protect your design
Upgrading Components
Upgrading parts boosts performance and style. Swap out basic tires for ones with better grip. Replace the seat with a softer or themed version.
Change the handlebars for better control or comfort. Add LED lights for a cool and safe ride. Use stronger batteries to increase speed and run time.
| Component | Upgrade Idea | Benefit |
|---|---|---|
| Tires | All-terrain tires | Better grip on different surfaces |
| Battery | High-capacity lithium-ion | Longer ride time and faster speed |
| Lights | LED head and tail lights | Increased visibility and safety |

Credit: www.youtube.com
Frequently Asked Questions
What Materials Are Needed To Make An Electric Bike Toy?
You need a small electric motor, battery pack, wires, switch, and a toy bike frame. Also, basic tools like a soldering iron and screwdriver help in assembly.
How Do I Safely Connect The Battery To The Motor?
Ensure correct polarity by matching positive and negative terminals. Use insulated wires and secure connections with solder or connectors to avoid short circuits.
Can Beginners Build An Electric Bike Toy Easily?
Yes, beginners can build it with basic knowledge of electronics. Following step-by-step instructions ensures a safe and functional toy.
How Long Does The Electric Bike Toy Run On One Charge?
Run time depends on the battery capacity and motor efficiency. Typically, a small battery powers the toy for 30 to 60 minutes.
Conclusion
Making an electric bike toy can be fun and rewarding. It teaches basic skills and creativity. You can build it with simple parts and tools. This project is perfect for kids and beginners. Enjoy the process and learn by doing.
Keep safety in mind at all times. Soon, you will have a cool toy to ride and share. Try new ideas and make your bike unique. Start today and see how much fun you can have.