






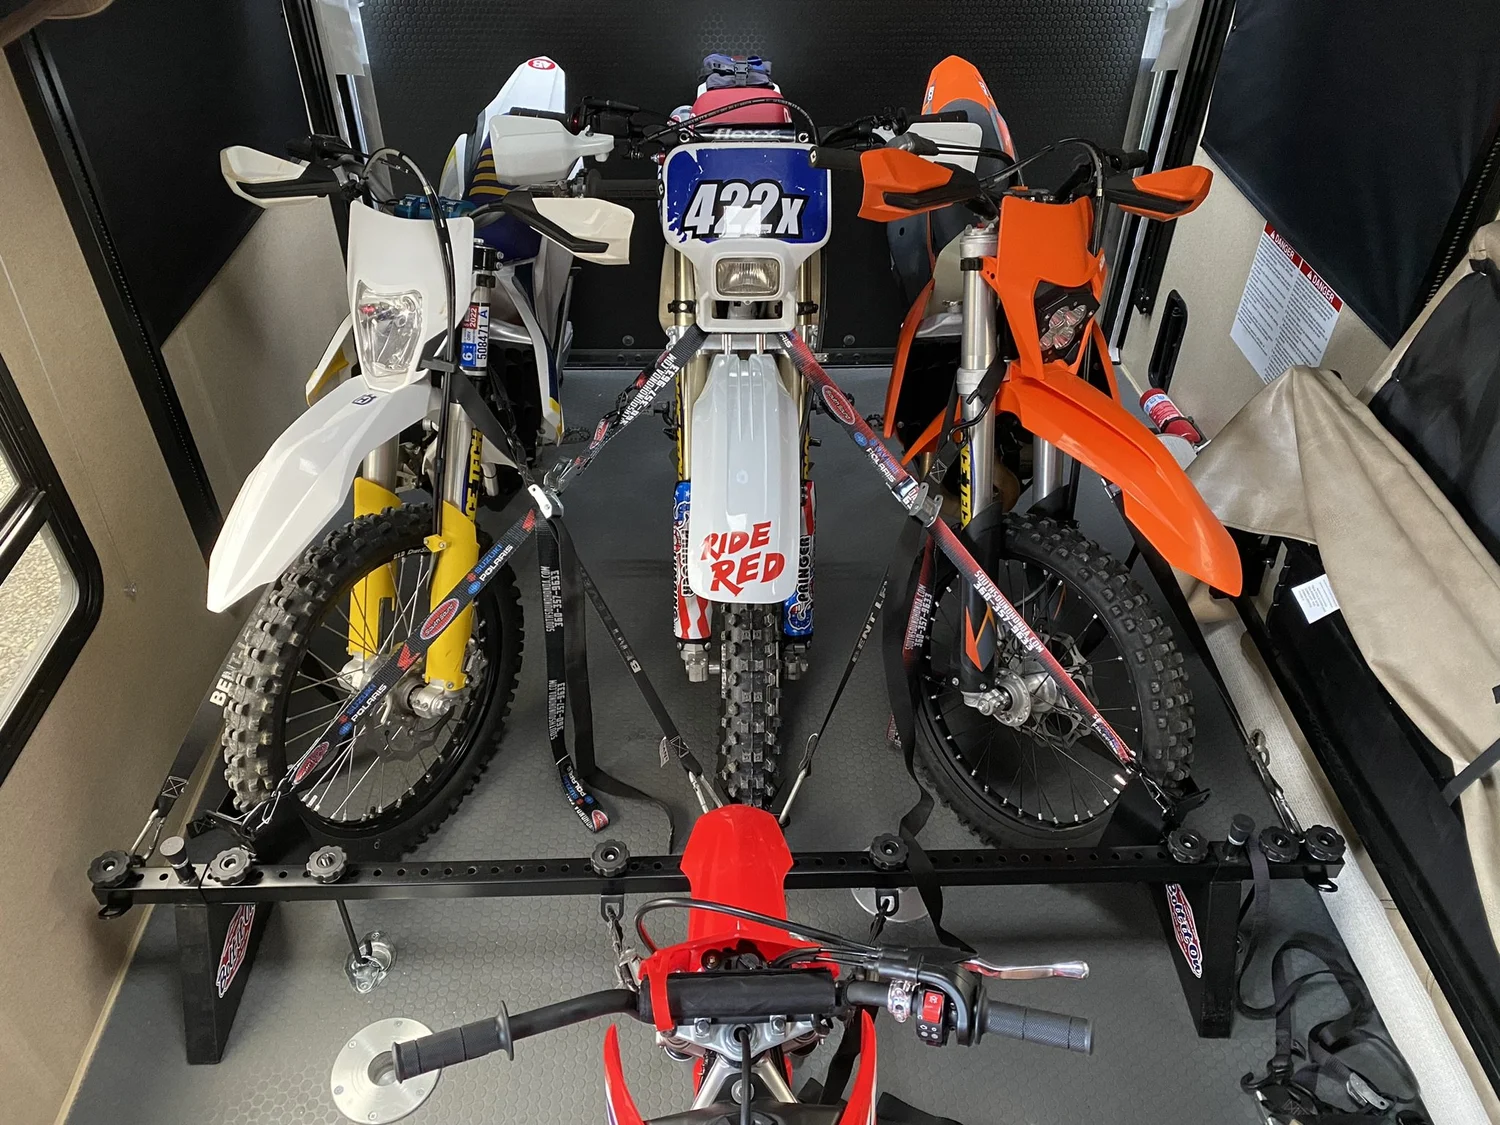
Tying down your dirt bike in a toy hauler might seem simple, but if it’s not done right, your bike could shift, get damaged, or even cause accidents while you’re on the road. You want your ride to stay safe and secure every mile of the trip.
In this guide, you’ll discover easy, effective steps to fasten your dirt bike properly, saving you stress and protecting your gear. Keep reading to learn how to make your next haul smooth and worry-free.
Credit: www.fordtransitusaforum.com
Choosing The Right Tie-down Straps
Choosing the right tie-down straps for securing your dirt bike in a toy hauler is crucial. The right straps keep your bike stable and safe during travel. Not all straps are made equal. Selecting straps with the proper strength and material ensures your bike stays in place without damage.
Consider the type, weight rating, and material of the straps carefully. These factors impact how well the straps perform under pressure. Understanding these details helps you pick straps that match your bike and toy hauler setup.
Types Of Straps
There are several types of tie-down straps. Ratchet straps offer strong tension and lock tightly. Cam buckle straps are easier to adjust but less secure. Bungee cords are flexible but not recommended for heavy bikes. Choose straps that provide firm hold without slipping.
Weight Ratings And Durability
Check the weight rating on each strap before buying. The rating shows the maximum load the strap can handle. Use straps with ratings higher than your bike’s weight. Durable straps resist wear and tear. Look for straps with reinforced stitching and heavy-duty buckles.
Material Considerations
Straps come in different materials like polyester, nylon, and polypropylene. Polyester resists stretching and holds tight under pressure. Nylon offers some stretch but can weaken when wet. Polypropylene is lightweight but less durable. Pick materials that stay strong and do not damage your bike’s finish.

Credit: www.builtbike.com
Preparing The Toy Hauler
Preparing the toy hauler is crucial before securing a dirt bike inside. This step ensures safety and prevents damage during transport. Taking time to get the space ready makes tying down easier and more effective.
Clearing The Loading Area
Remove all loose items and debris from the toy hauler floor. Clear space allows for smooth loading and prevents tripping hazards. Check corners and under seats for small objects that could interfere with tie-down straps.
Securing Anchor Points
Identify strong anchor points to attach tie-down straps. Use built-in D-rings or install heavy-duty anchors if needed. Ensure anchors are tight and positioned to hold the bike steady during travel.
Checking Floor Strength
Inspect the toy hauler floor for cracks or weak spots. A solid floor supports the bike’s weight and strap tension. Reinforce or avoid damaged areas to prevent accidents while on the road.
Positioning The Dirt Bike
Positioning the dirt bike correctly in a toy hauler is crucial for safe transport. Proper placement keeps the bike stable and protects it from damage. It also helps balance the load inside the hauler. Careful attention to where the bike sits makes tying it down easier and more secure.
Optimal Placement
Place the dirt bike near the center of the toy hauler floor. This spot offers the most stability during travel. Avoid placing the bike too close to the walls or doors. Leave enough space to walk around and secure tie-down straps comfortably. Position the bike with the front wheel facing forward to reduce movement.
Balancing Weight
Distribute the bike’s weight evenly over the hauler’s axles. This balance improves vehicle handling and safety. Avoid placing the bike too far forward or backward. Check the hauler’s weight limits and adjust placement to stay within safe limits. If carrying multiple bikes, space them evenly on both sides.
Avoiding Contact Damage
Prevent scratches and dents by avoiding bike contact with hard surfaces. Use soft pads or foam blocks between the bike and hauler walls. Keep handlebars and mirrors clear of tight spots. Ensure the bike does not touch other cargo items. Secure loose parts to stop them from moving during transit.
Step-by-step Tie-down Process
Tying down a dirt bike in a toy hauler ensures safe transport. Follow these steps for a secure and worry-free journey. Ensure you have all the necessary equipment ready. This includes strong straps and reliable anchor points.
Attaching Straps To The Bike
Begin by selecting the right spots on your dirt bike. Choose sturdy parts like the handlebars or the frame. Avoid attaching straps to any loose or fragile parts. Use at least two straps for the front and two for the back. This provides balanced support and prevents shifting during transport.
Securing Straps To Anchor Points
Locate the anchor points in your toy hauler. These are usually metal loops or bars. Securely attach the other end of the straps to these points. Ensure the straps are not twisted. Twisted straps can cause instability and may come loose.
Tensioning And Tightening
Once the straps are in place, begin tightening them. Use a ratchet or buckle to increase tension. The straps should be tight, but not overly tight. This prevents damage to your bike’s suspension. Check each strap twice to ensure they are secure.
Test the bike by gently rocking it side to side. If it moves, tighten the straps more. A stable bike should not shift during transport.
Additional Safety Measures
Securing your dirt bike inside a toy hauler is more than just using straps. Adding extra safety measures can make a huge difference in protecting your bike and your peace of mind during transit. These simple steps can prevent damage and keep your ride stable even on rough roads.
Using Wheel Chocks
Wheel chocks are essential for stopping your dirt bike from rolling forward or backward. They fit snugly around the tire, holding it firmly in place. You can find adjustable chocks that fit different tire sizes, which is helpful if you transport multiple bikes.
Place the chocks on both sides of the front or rear wheel, depending on where your tie-down straps are anchored. This extra grip reduces strain on the straps and keeps the bike steady. Have you ever noticed how a bike still shifts slightly even when strapped tight? Wheel chocks fix that.
Double Checking Strap Tension
Straps can loosen during travel, especially on bumpy roads. After securing your bike, give each strap a solid pull to make sure it’s tight but not so tight it damages the bike. Over-tightening can bend handlebars or compress suspension, which you want to avoid.
Before hitting the road, test each strap’s tension again. It’s easy to forget this step, but a quick double-check can save you from a costly repair. Consider carrying a small tension gauge if you want a more precise measure.
Protecting Bike Components
Straps can rub against sensitive parts like the gas tank, seat, or handlebars. Adding padding—like foam sleeves, old towels, or even pipe insulation—between the straps and your bike prevents scratches and dents. This simple addition protects your bike’s finish during long hauls.
Think about your bike’s most vulnerable spots and cover them before tightening straps. Have you ever seen a chipped paint job or a torn seat after transport? Taking a few extra minutes to add protection can save you from those frustrating damages.
Common Mistakes To Avoid
Tying down your dirt bike inside a toy hauler requires attention to detail. Avoiding common mistakes can save your bike from damage and keep it secure during transport. Here are some pitfalls you should watch out for to ensure your ride stays safe.
Loose Straps
Loose straps are one of the biggest risks when securing your dirt bike. Even a slight slack can allow the bike to shift, causing scratches or tipping over. Always check the tension before hitting the road and re-tighten if necessary during stops.
I once thought a quick strap check was enough, but a sudden bump almost knocked my bike over. That experience taught me to double-check straps carefully every time.
Incorrect Anchor Usage
Using the wrong anchor points can lead to ineffective tie-downs. Not all hooks or rings in a toy hauler are designed for heavy loads. Make sure you attach straps to strong, fixed anchor points rated for your bike’s weight.
Ask yourself: Are these anchor points sturdy enough to hold the force of movement? If in doubt, invest in additional anchors or tie-down systems to avoid surprises.
Overtightening Damage
While tight straps are essential, overtightening can cause damage to your bike’s frame or suspension. Straps pulled too hard can bend parts or compress shocks unnecessarily. Use just enough tension to keep the bike stable but not stressed.
Think about the balance between security and care. Your goal is to keep your bike firm without forcing it into an unnatural position that could cause long-term harm.
Maintenance And Inspection Tips
Maintaining and inspecting your tie-down gear is key to safe dirt bike transport. Regular checks keep straps and equipment reliable. This prevents accidents and damage during travel. Spend time checking before each trip for peace of mind.
Regular Strap Inspection
Look closely at all straps for frays, cuts, or worn spots. Examine hooks and buckles for rust or cracks. Pay attention to stitching and fabric strength. Replace any strap showing signs of wear. Clean straps with mild soap and water to remove dirt.
Replacing Worn Equipment
Old or damaged straps reduce holding power. Always swap out gear that looks weak or broken. Use strong, quality replacements designed for dirt bike tie-downs. Avoid using makeshift or damaged items. Keep extra straps on hand for emergencies.
Pre-trip Safety Checks
- Confirm all straps are tight and secure.
- Check that hooks attach firmly to anchor points.
- Test for any movement or slipping of the bike.
- Look for sharp edges that may cut straps.
- Ensure the bike sits evenly and balanced.
Perform these quick checks before every journey. They ensure your dirt bike stays safe inside the toy hauler.
Credit: www.goldwingfacts.com
Frequently Asked Questions
How Do I Secure A Dirt Bike In A Toy Hauler?
Use heavy-duty ratchet straps to secure the bike’s frame and wheels. Attach straps to built-in anchor points inside the toy hauler. Tighten straps evenly to prevent movement during transport. Double-check all connections before driving for safety.
What Are The Best Tie-down Points On A Dirt Bike?
Focus on the lower triple clamp, rear footpegs, and swingarm as tie-down points. These areas provide strong, stable anchor spots without damaging the bike. Avoid attaching straps to handlebars or suspension to prevent damage.
Can I Use Bungee Cords To Tie Down My Dirt Bike?
Bungee cords are not recommended for tying down dirt bikes. They lack the strength and stability required for safe transport. Use ratchet straps or cam buckle straps instead for secure and reliable tie-downs.
How Tight Should Tie-down Straps Be On A Dirt Bike?
Straps should be tight enough to prevent any bike movement but not overly tight. Over-tightening can damage the suspension or frame. Aim for firm tension that keeps the bike stable without causing stress.
Conclusion
Tying down a dirt bike in a toy hauler keeps it safe during travel. Use strong straps and attach them to solid points on the bike and hauler. Check the tension often to avoid slipping. Secure both front and rear parts of the bike.
This simple process prevents damage and keeps your bike steady. Always take time to do it right. Ready for your next ride? Safe transport starts with proper tie-downs.