






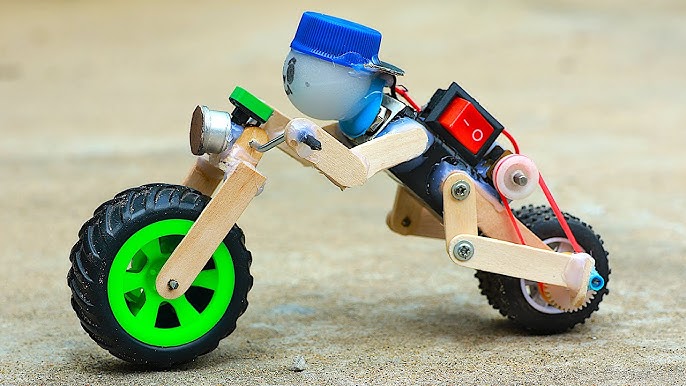
Have you ever wanted to create something fun and exciting with your own hands? Making a toy bike is a great way to bring your creativity to life and enjoy a rewarding project.
Whether you’re looking for a unique gift or a new hobby, this simple guide will show you exactly how to build a toy bike step by step. By the end, you’ll have a cool, handmade toy that you can be proud of.
Ready to get started? Let’s dive in!
Materials Needed
Gathering the right materials is the first step to building a toy bike. The materials affect the bike’s strength, look, and functionality. Choose items that are easy to handle and safe for kids. Organize your supplies before starting to save time and avoid interruptions.
Basic Tools
- Screwdriver – for assembling parts
- Scissors – to cut materials
- Glue gun or strong adhesive – to fix pieces together
- Pliers – for bending wires or holding small parts
- Measuring tape or ruler – to measure components accurately
- Sandpaper – to smooth rough edges
Parts And Components
- Wooden sticks or plastic rods – for the bike frame
- Small wheels – such as from toy cars or craft stores
- Axles – thin rods or skewers to attach wheels
- Cardboard or plastic sheets – for the seat and handlebars
- Rubber bands – to create tension or flexible parts
- Paint or markers – for base colors
Optional Decorative Items
- Stickers – to add fun designs
- Colored tape – for stripes or patterns
- Glitter – to make the bike sparkle
- Small beads or buttons – for extra details
- Fabric scraps – to mimic seat covers

Credit: www.msn.com
Choosing A Design
Choosing the right design is a key step in making a toy bike. The design affects how easy it is to build and how fun the final toy will be. Think about who will use the toy and the tools you have. This helps pick a design that fits your skills and materials.
Simple Vs. Complex Models
Simple models are great for beginners or quick projects. They use fewer parts and basic shapes. This makes them easier to build and repair. Simple toy bikes still look nice and can be very sturdy.
Complex models have more details and moving parts. They look more like real bikes and can be very exciting to make. These models need more time, skill, and tools. Choose complex designs if you want a challenge and a detailed toy.
Size And Scale Considerations
Size matters in toy bike design. Small bikes are easier to store and carry. They need fewer materials and take less time to build. Big bikes can be more impressive but need more space and parts.
Think about the scale too. Matching the size of wheels, frame, and handlebars makes the bike look balanced. Keep the size suitable for the child’s hands and play area. This makes the toy safer and more enjoyable.
Cutting And Shaping Parts
Cutting and shaping parts is a crucial step in making a toy bike. It defines the bike’s look and ensures all pieces fit well. Taking time here makes assembly easier and the final toy stronger. Use the right tools and techniques to get clean, accurate cuts. Careful shaping brings the toy bike to life and adds safety by removing sharp edges.
Measuring And Marking
Start by measuring each part carefully. Use a ruler or tape measure for accuracy. Mark the cutting lines clearly with a pencil or marker. Double-check measurements before cutting to avoid mistakes. Use simple shapes like rectangles and circles for easier cutting. Mark all parts on the material before starting any cuts. Clear marks guide your cutting and save time.
Safe Cutting Techniques
Choose the right tool: a small saw, craft knife, or scissors. Cut slowly along the marked lines to avoid slips. Keep fingers away from the blade at all times. Use a cutting mat or board to protect your work surface. Wear safety glasses to protect your eyes from dust or small chips. Smooth sharp edges with sandpaper to prevent injuries. Always work in a clean, well-lit area for better control.

Credit: www.youtube.com
Assembling The Frame
Begin by connecting the main parts of the toy bike frame carefully. Make sure all joints fit tightly to keep the frame strong and stable. Use simple tools to secure the pieces without forcing them.
Assembling the frame of a toy bike can be an exciting task. It’s where your creation starts to take shape. Careful assembly ensures the bike is sturdy and safe. Here’s how you can assemble the frame with ease.Joining Techniques
Different techniques help in joining the parts of a toy bike. Glue is a common choice for wood or plastic parts. It offers a strong bond. Bolts and screws are better for metal parts. They provide extra security. Each technique ensures the frame stays intact. Choose the right method for your materials.Ensuring Stability
Stability is crucial for a toy bike. A wobbly frame can lead to accidents. Ensure all joints are secure and tight. Check for any loose parts. Reinforce weak spots with additional support. Use a level to check evenness. A stable frame ensures a safe and fun experience.Adding Wheels And Handlebars
Attach small wheels securely to the bike frame for smooth movement. Fix the handlebars firmly to ensure easy steering and control.
Crafting a toy bike can be an immensely rewarding experience, not just for the little ones who will enjoy it, but also for you as a creator. Adding wheels and handlebars is a critical step that transforms your toy bike from a simple frame to something that resembles a real bike. This stage is where functionality meets fun, and it’s easier than you might think.Attaching Wheels
To attach the wheels, gather all your components: the wheels, axles, and any necessary nuts or bolts. Ensure that the wheels are of equal size to maintain balance. Begin by placing the axles through the wheel’s center hole. Secure each wheel onto the frame with nuts, tightening them just enough to keep the wheel in place without restricting its movement. Test the wheels by giving them a gentle spin. If they wobble or resist, recheck your connections. A smooth roll means you’re on the right track.Installing Handlebars
The handlebars are not just for steering; they are the bike’s guiding force. Select handlebars that are proportionate to the bike’s size. Insert the handlebars into the designated slot on the frame. Secure them firmly with screws or a tightening mechanism to ensure they don’t shift during play. Adjust the handlebars to a comfortable angle. This is where personal preference comes into play. Would your child prefer a more upright or slightly forward-leaning position? Taking the time to carefully attach the wheels and install the handlebars ensures that your toy bike is not only sturdy but also a joy to use. As you complete these steps, imagine the thrill of the first ride.Painting And Decorating
Painting and decorating your toy bike is where it truly comes to life. This part lets you express creativity and make the bike uniquely yours. Careful choices here can transform a simple frame into a stunning piece that stands out.
Choosing Paints
Pick paints that suit the material of your toy bike—wood, plastic, or metal each need different types. Acrylic paints work well on most surfaces and dry quickly, which is perfect if you’re eager to see results fast.
Consider non-toxic, water-based paints if the toy is for children. They’re safer and easy to clean up. Also, think about the finish you want: matte gives a subtle look, while glossy adds shine and highlights details.
Have you checked if your paints need a primer? Adding a primer layer can help the paint stick better and last longer, especially on smooth surfaces like plastic.
Creative Decoration Ideas
Decorating isn’t just about paint colors. Adding stickers, decals, or even tiny accessories can boost the fun factor. You can use washi tape for colorful stripes or small buttons as imaginative knobs.
Try mixing textures by using fabric scraps or felt to create seat covers or handle grips. This adds a tactile element that makes the toy more interesting to touch and look at.
- Use stencils to paint numbers or patterns neatly.
- Apply glitter or metallic paints for a flashy effect.
- Personalize with initials or fun symbols to make it truly yours.
What decoration will make your toy bike one of a kind? Sometimes a small detail can change the entire vibe of your creation.
Final Touches
Adding the final touches to your toy bike is where your creation truly comes to life. This stage is about more than just looks; it’s about making sure the bike is safe and fun to use. Taking a bit of extra time here can make all the difference between a toy that’s just pretty and one that’s ready for play.
Checking For Safety
Safety should be your top priority before letting anyone ride the toy bike. Run your fingers along every edge and corner to make sure there are no sharp points that could hurt little hands. Check that all screws and parts are tightly secured to avoid any pieces coming loose during play.
Look at the materials you used—are they non-toxic and child-friendly? If you painted the bike, confirm that the paint is completely dry and safe for kids. Think about the size of the wheels and pedals; they shouldn’t pinch fingers or trap clothing.
Testing The Toy Bike
Once you’re confident the bike is safe, it’s time to test it out. Give it a gentle push to see how smoothly the wheels roll. Does it balance well, or does it tip over easily? These simple checks can reveal if any adjustments are needed.
Try sitting on the bike yourself or ask a child to test it under supervision. Notice if the seat is comfortable and if the handlebars are easy to grip. Testing helps you understand how the bike performs in real use, which is essential before gifting or storing it away.

Credit: m.youtube.com
Tips For A Successful Project
Successful toy bike projects need careful planning and simple steps. Follow clear tips to keep the project fun and safe. This helps in creating a toy bike that kids will love and use with joy.
Working With Kids
Keep kids involved in easy tasks like painting or assembling large parts. Use safe tools and explain every step in simple words. Patience is key; let kids ask questions and explore freely.
Set small goals to avoid frustration and celebrate every success. Watch carefully to prevent accidents and offer help when needed. Make the workspace clean and organized for better focus.
Troubleshooting Common Issues
Check parts fit before final assembly to avoid mistakes. Tighten screws gently to prevent breaking pieces. If the bike feels unstable, adjust the wheels or frame carefully.
Use glue sparingly to avoid mess and weak joints. Test the bike after each step to find problems early. Replace damaged parts quickly to keep the project on track.
Frequently Asked Questions
What Materials Are Needed To Make A Toy Bike?
To make a toy bike, you need wood or plastic, small wheels, glue, paint, and screws. These materials are easy to find and safe for crafting at home.
How Long Does It Take To Make A Toy Bike?
Making a toy bike typically takes 2 to 4 hours. The time depends on your experience and the complexity of the design.
Can Children Safely Make A Toy Bike At Home?
Yes, children can safely make a toy bike with adult supervision. Use non-toxic materials and child-friendly tools for safety.
What Are Simple Steps To Build A Toy Bike?
Start by cutting the frame, attaching wheels, assembling parts, and painting. Follow a step-by-step guide to ensure accuracy and fun.
Conclusion
Making a toy bike is fun and simple. You only need a few basic materials. Follow the steps carefully, and take your time. This project helps improve your creativity and skills. Kids and adults can enjoy making it together. A homemade toy bike brings joy and learning.
Try it today and see how much fun crafting can be!