






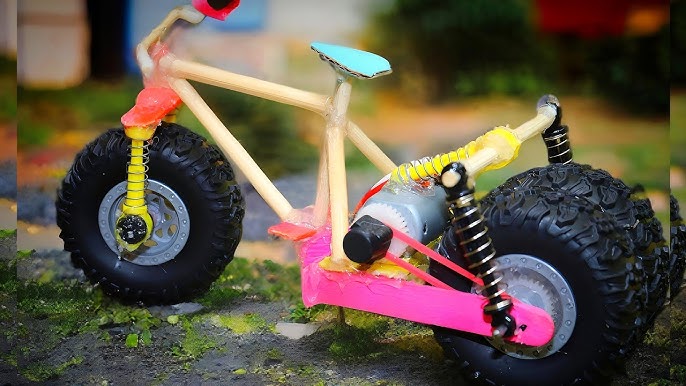
Are you ready to create something fun and exciting with your own hands? Making an electric bike toy is easier than you think, and it’s a perfect project to spark your creativity.
Imagine the thrill of riding a toy bike that moves with real electric power—built by you! In this guide, you’ll discover simple steps to turn basic parts into a cool electric bike toy. Whether you want to impress your friends or enjoy a hands-on learning experience, this article will show you exactly how to do it.
Keep reading, and let’s get your electric bike toy rolling!

Credit: www.youtube.com
Materials Needed
Gathering the right materials is the first exciting step to making your own electric bike toy. Each part you choose shapes how well your project works and how much fun you’ll have putting it together. Let’s break down exactly what you’ll need so you can get started with confidence.
Basic Components
- Small electric motor:This will power your bike toy. Choose one that matches the size of your bike for smooth movement.
- Battery pack:A rechargeable battery works best to keep your toy running longer without needing constant replacement.
- Wheels and frame:Use lightweight materials like plastic or thin metal for easy handling and speed.
- Switch:A simple on/off switch lets you control when the motor runs.
- Wires and connectors:These connect the battery to the motor and switch. Make sure they are insulated to avoid shorts.
- Gears or pulleys:Optional but useful if you want to adjust the speed or torque of your bike toy.
Tools Required
- Screwdriver set:Essential for assembling parts and securing the motor and wheels.
- Soldering iron:Needed to connect wires firmly and ensure good electrical contact.
- Wire stripper:Helps remove insulation cleanly without damaging the wires.
- Hot glue gun or epoxy:For fixing parts securely without screws in tricky spots.
- Multimeter:Useful for testing electrical connections and battery voltage.
Safety Gear
Your safety matters every step of the way. Protect your eyes with safety goggles, especially when soldering or cutting wires. Gloves can prevent burns and cuts when handling sharp tools or hot glue. Working in a well-ventilated space keeps you safe from fumes released by soldering or adhesives.
Have you checked if your workspace is well-lit and clutter-free? A tidy area reduces accidents and helps you focus on assembling your electric bike toy smoothly.
Choosing The Right Bike Toy
Choosing the right bike toy is key to making a fun electric bike for kids. The right choice ensures safety, comfort, and hours of play. It helps the project go smoothly and the final toy to work well. Focus on the type, size, and battery to fit the child’s needs and skills.
Types Of Bike Toys
Bike toys come in many styles. Some look like real bikes, while others are simple scooters or tricycles. Electric versions often mimic small motorcycles or classic bicycles. Picking the style matters for how the electric parts fit and how the toy moves. Choose a type that suits the child’s interests and riding ability.
Size And Weight Considerations
Size must match the child’s height and leg length. Too big or too small can cause discomfort and danger. Weight is also important. A heavy bike toy is hard for kids to handle. Lightweight toys are easier to control and safer to ride. Measure the child and pick a toy that feels balanced and stable.
Battery Options
Batteries power the electric motor. Choose between lithium-ion, lead-acid, or nickel-metal hydride types. Lithium-ion batteries are light and last long but cost more. Lead-acid batteries are heavier and cheaper. Nickel-metal hydride offers a middle ground. Battery size affects how far and fast the bike toy can go. Pick a battery that fits the toy’s frame and the child’s playtime needs.
Assembling The Motor
Assembling the motor is a key part of building an electric bike toy. The motor powers the toy, making it move. Proper assembly ensures the toy runs smoothly and safely. This section explains how to select the right motor, connect the wiring, and attach the motor to the frame.
Selecting The Motor
Choose a motor that fits the size of your bike toy. Small DC motors are best for toys. Check the motor’s voltage and current ratings. Use a motor with a power output suitable for the toy’s weight. Brushless motors last longer but cost more. Brushed motors are easier to find and use.
Wiring Basics
Use wires that match the motor’s voltage and current. Connect the motor’s positive wire to the battery’s positive terminal. Connect the negative wire to the battery’s negative terminal. Include a switch in the circuit to turn the motor on and off. Use electrical tape or heat shrink tubing to cover wire joints. Keep wires neat to avoid damage and shorts.
Attaching The Motor To The Frame
Find a spot on the bike frame to mount the motor firmly. Use screws or clamps to hold the motor in place. The motor shaft should align with the wheel or gear. Ensure the motor does not touch moving parts except the drive system. Test the motor’s position by turning the wheel by hand. Tighten all fasteners to prevent movement during use.

Credit: www.youtube.com
Installing The Battery
Place the battery securely in the bike’s frame or designated compartment. Connect the wires carefully to avoid loose contacts and ensure proper power flow. Double-check all connections before turning on the toy for safety.
Battery Placement
The first step is to find the perfect spot for your battery. Ideally, it should be centrally located to maintain balance. Most electric bike toys have a designated compartment for the battery, usually under the seat or in the frame. Make sure this compartment is clean and dry. Any moisture can damage the battery or affect its performance. If the compartment is tight, consider using a soft padding to protect the battery from vibrations.Connecting The Battery
Once the battery is in place, it’s time to connect it. You’ll typically find two wires: one red and one black. The red wire connects to the positive terminal, while the black wire connects to the negative terminal. Ensure the connections are tight and secure. Loose connections can lead to power interruptions and reduce efficiency. Double-check that the wires are not twisted or tangled, as this can cause wear over time.Ensuring Safety
Safety is paramount when dealing with batteries. Always wear protective gloves and goggles when handling them. Batteries contain chemicals that can be hazardous if leaked. Check for any signs of damage on the battery, such as swelling or leaking. If you notice anything unusual, replace the battery immediately. Finally, keep the battery away from extreme temperatures. High heat or freezing conditions can degrade its performance rapidly. By paying attention to these details, you ensure your electric bike toy runs smoothly and safely. What other steps do you think are critical when setting up an electric bike toy? Share your thoughts!Adding Controls
Adding controls to your electric bike toy is where your creation truly comes to life. This step lets you manage speed, stop safely, and power the bike on or off. Getting these controls right improves the riding experience and ensures safety, so take your time to install them carefully.
Throttle Installation
The throttle lets you control your bike’s speed easily. Most electric bike toys use a twist or thumb throttle. Mount the throttle on the handlebar where your thumb or fingers can reach it comfortably without straining.
Connect the throttle wires to the motor controller following the color codes—usually red for power, black for ground, and the signal wire. Test it before finalizing to make sure the motor responds smoothly as you twist or press the throttle. Have you checked if the throttle feels natural for your hand size?
Brake Integration
Brakes are essential for safety and control. If your toy bike has mechanical brakes, you can add brake levers with built-in motor cutoff switches. These switches stop the motor immediately when you squeeze the brakes, preventing accidents.
Wire the brake cutoff switch in series with the motor’s power supply. This ensures the motor power cuts off whenever you hit the brakes. Try squeezing the brakes while the bike is running to confirm the motor stops without delay. Could you imagine riding without this feature?
Switch Setup
Setting up a power switch helps you turn your electric bike toy on and off easily. Use a simple toggle or push-button switch rated for the motor’s voltage and current. Place the switch within easy reach but away from accidental bumps.
Wire the switch between the battery and the motor controller’s power input. This lets you cut off power completely when the bike isn’t in use, preserving battery life and adding a safety layer. Think about where you naturally reach to switch your bike on—does your setup match that?
Testing And Adjustments
Testing and adjustments are key to making your electric bike toy work well. This stage ensures all parts function safely and smoothly. Careful testing helps find problems early. It also shows where changes are needed for better performance.
Initial Power On
Start by powering the bike toy for the first time. Check the battery connection and power switch. Watch for any sparks or unusual sounds. Keep the bike steady and ready to stop power quickly. Confirm the motor runs without jerks or stops. This step verifies the basic electrical setup.
Speed Testing
Test the bike toy’s speed on a flat surface. Use a stopwatch to measure how fast it goes. Note if the speed feels consistent or if it slows down. Check the throttle response to make sure it is smooth. Observe the bike’s control and stability at different speeds. Record these details for future improvements.
Troubleshooting Common Issues
Some common issues may appear during testing. The bike might not start or the motor could stall. Battery connections might be loose or wires damaged. Look for overheating parts or strange noises. Tighten screws and recheck electrical contacts. Replace faulty components if needed. Use a simple checklist to track fixes:
- Battery fully charged and connected
- Motor wires secure and undamaged
- Throttle works smoothly
- Brakes do not interfere with movement
- No unusual sounds or smells
Decorating And Personalizing
Decorating and personalizing your electric bike toy transforms it from a simple project into something truly yours. It’s where creativity meets functionality, making your bike stand out and reflect your style. Adding your personal touch also makes the toy more enjoyable to use and show off to friends and family.
Painting Tips
Choose paint designed for plastic or metal, depending on your bike’s material, to ensure it sticks well and lasts long.
Apply a primer first to help the paint adhere better and prevent chipping. Use light, even coats rather than one heavy coat to avoid drips and achieve a smoother finish.
Try using painter’s tape to create clean lines or patterns. Have you thought about using stencils to add unique shapes or initials? It’s a simple trick that adds a professional touch without much effort.
Adding Stickers
Stickers are an easy way to add personality without permanent changes. Look for waterproof and weather-resistant stickers so they stay vibrant even after outdoor play.
Mix and match different sizes and shapes to create a dynamic look. Placing stickers on unexpected spots like the underside of the seat or the inside of the frame can be a fun surprise for anyone who takes a closer look.
Have you tried customizing your own stickers? Printing your own designs lets you express exactly what you want on your bike toy.
Custom Accessories
Adding accessories like mini baskets, bells, or LED lights can make your electric bike toy more fun and functional.
Look for items that clip or stick on easily without damaging the bike. You can find small mirrors or even a tiny horn to give your bike a realistic feel.
Consider accessories that reflect your hobbies or favorite colors. How about a tiny flag or a personalized license plate? These little touches make your bike feel one-of-a-kind.

Credit: www.youtube.com
Safety Tips For Kids
Always wear a helmet and protective gear while using an electric bike toy. Check all parts carefully to ensure they are secure and safe before riding. Teach kids to use the toy in safe, open areas away from traffic.
Ensuring the safety of children is crucial when they play with electric bike toys. Taking the right precautions can prevent accidents and injuries. Here are essential safety tips to keep in mind.Helmet And Pads
Always equip kids with a helmet. It protects their head from injuries. Choose a helmet that fits snugly. Elbow and knee pads are also important. They cushion falls and protect delicate joints. Make wearing these safety gears a habit.Safe Riding Areas
Identify safe areas for riding. Prefer smooth, flat surfaces with no obstacles. Avoid busy streets or rough terrains. Parks or driveways are good options. Ensure the area is free from traffic.Supervision Guidelines
Supervision is key when kids ride electric bike toys. Always keep a watchful eye on them. Be ready to intervene if needed. Teach them basic riding rules. Explain the importance of staying within set boundaries.Frequently Asked Questions
What Materials Do I Need To Make An Electric Bike Toy?
You need a small electric motor, battery, wheels, a frame, wires, and a switch. These parts are easy to find online or at electronics stores.
How Do I Assemble The Electric Motor In The Bike Toy?
Attach the motor securely to the bike frame near the rear wheel. Connect the motor shaft to the wheel for smooth rotation.
What Type Of Battery Is Best For Electric Bike Toys?
Use a rechargeable lithium-ion battery. It’s lightweight, powerful, and lasts longer compared to other battery types.
How Can I Ensure The Electric Bike Toy Is Safe To Use?
Check all wiring connections are secure and insulated. Avoid loose parts and test the toy under supervision before use.
Conclusion
Building an electric bike toy can be fun and rewarding. You just need some basic parts and tools. Follow the steps carefully and take your time. Testing the toy ensures it works safely and smoothly. Kids will enjoy riding a bike that moves with electric power.
This project also teaches simple electronics and mechanics. Keep experimenting to improve your design. Making things with your hands feels great. Try creating different models and see what works best. Enjoy the process and have fun building!