






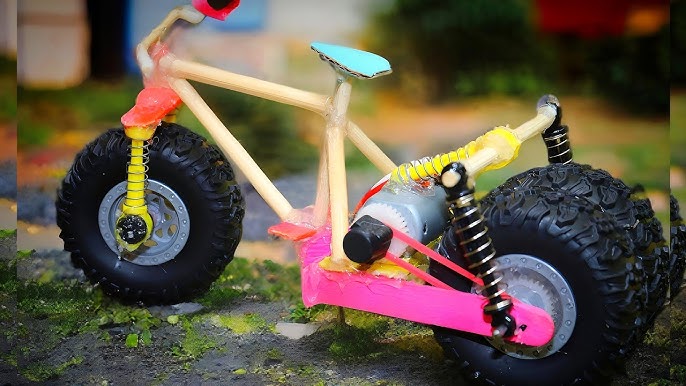
Have you ever wanted to build your own electric toy bike? Imagine the pride you’ll feel when your creation zooms around, powered by your own hands.
Whether you’re looking for a fun project or a unique gift, making an electric toy bike is easier than you think. In this guide, you’ll discover simple steps and tips that anyone can follow—no advanced skills needed. Ready to turn your ideas into a cool, working toy?
Keep reading, and let’s get started!
Materials Needed
Gathering the right materials is the first step in building your electric toy bike. Having everything ready before you start saves time and keeps the process smooth. Let’s look at what you absolutely need to bring your project to life.
Basic Components
- Electric Motor:Choose a small DC motor suitable for the toy bike’s size and weight.
- Battery Pack:A rechargeable lithium-ion battery works well for powering the motor efficiently.
- Chassis or Frame:Use a lightweight but sturdy frame—plastic or metal—depending on your design.
- Wheels and Tires:Select wheels that fit the frame and allow smooth movement on typical surfaces.
- Throttle or Speed Controller:This lets you control the motor’s speed easily.
- Wiring and Connectors:Ensure you have insulated wires and reliable connectors to link the electrical parts safely.
- Switch:A simple on/off switch is essential for controlling the bike’s power supply.
- Charging Port:Incorporate a port for convenient battery recharging.
Have you ever tried using a motor that was too weak or a battery that drained quickly? Picking parts that match your bike’s size and weight makes a huge difference.
Tools Required
- Screwdrivers:Both flathead and Phillips types will help assemble the frame and components.
- Soldering Iron:Needed for making strong electrical connections between wires and components.
- Wire Strippers and Cutters:To prepare wires without damaging them.
- Hot Glue Gun or Epoxy:For securing small parts firmly in place.
- Multimeter:This tool helps test electrical connections and battery voltage.
- Drill and Drill Bits:Useful if you need to create holes in the frame for mounting components.
Think about how having the right tools can save you frustration. For example, a soldering iron might seem intimidating at first, but it makes your connections last longer and work better. Do you have these tools ready, or will you need to borrow or buy some before you start?

Credit: www.youtube.com
Choosing The Right Bike Frame
Choosing the right bike frame sets the foundation for your electric toy bike project. The frame not only supports the weight but also affects the bike’s stability and handling. Picking the best frame ensures your build is safe and enjoyable to ride.
Size Considerations
The frame size must match the rider’s height and age to provide comfort and control. Too big a frame can make it hard to reach the handlebars or pedals, while too small a frame might feel cramped and unstable.
Think about the rider’s growth if the bike is for a child. You might want to choose a frame that offers some room to grow without sacrificing safety.
Measure the rider’s inseam and overall height, then compare these numbers with the frame dimensions. Many bike manufacturers provide size charts that can guide you to the right fit.
Material Options
The frame material impacts the bike’s weight, durability, and cost. Common materials include steel, aluminum, and sometimes plastic for toy bikes.
- Steel:Strong and durable but heavier. It’s great if you want a sturdy bike that can handle rough play.
- Aluminum:Lightweight and rust-resistant. This material makes the bike easier to carry and maneuver, especially for kids.
- Plastic:Mostly for very small or simple toy bikes. It’s light but not as strong or long-lasting as metal frames.
Consider your priorities: Do you want a lighter bike for easier handling, or a tougher frame that lasts longer? Your answer will guide your material choice.
Selecting The Motor
Selecting the right motor is crucial when building an electric toy bike. The motor determines how fast the bike will go, how much power it delivers, and how long the battery will last. Choosing a motor that fits your bike’s size and your child’s riding style makes the experience safer and more fun.
Types Of Motors
You will mainly choose between brushed and brushless motors. Brushed motors are simpler and cheaper but wear out faster because of their brushes. Brushless motors last longer, run quieter, and are more efficient but come at a higher price.
Another option is hub motors, which fit directly into the wheel, making your bike look cleaner and easier to assemble. Mid-drive motors mount near the pedals and offer better torque for climbing hills, but they are more complex to install.
- Brushed Motor:Easy to find, budget-friendly, but less durable.
- Brushless Motor:More efficient, longer life, smoother operation.
- Hub Motor:Compact, less maintenance, good for flat terrain.
- Mid-Drive Motor:Powerful torque, better for varied terrain, complex setup.
Power And Speed
Think about how fast you want the bike to go and how much power it needs to get there. Motors are rated in watts, typically ranging from 100W to 500W for toy bikes. Higher wattage means more power but also drains the battery faster.
Consider the rider’s weight too. A heavier rider or a bike designed for off-road use needs a more powerful motor. If speed isn’t your priority, a lower watt motor can provide longer ride time and better battery life.
| Motor Power (Watts) | Approximate Speed | Battery Impact | Best Use |
|---|---|---|---|
| 100W – 200W | 5-10 mph | Longer battery life | Young kids, flat terrain |
| 200W – 350W | 10-15 mph | Moderate battery use | Older kids, moderate hills |
| 350W – 500W | 15-20 mph | Shorter battery life | Heavier riders, rough terrain |
Have you thought about how you’ll balance speed with battery life? It’s tempting to pick the most powerful motor, but that choice might leave you charging the bike constantly. Sometimes, less power and more ride time make for a better experience overall.
Battery Selection And Installation
Choosing the right battery and installing it correctly is essential for building a reliable electric toy bike. The battery powers the motor, affecting speed, runtime, and overall performance. Making a careful choice ensures your bike runs smoothly and safely, giving you the best experience.
Battery Types
There are a few common battery types you can consider for your electric toy bike:
- Lead-Acid Batteries:These are affordable and easy to find but heavier and bulkier. They deliver decent power but have a shorter lifespan.
- Nickel-Metal Hydride (NiMH):Lighter than lead-acid and offer better capacity. They are safer but can be more expensive.
- Lithium-Ion (Li-ion):The most popular choice for electric toys. They are lightweight, have high energy density, and last longer. However, they require careful handling and a proper charger.
Think about how long you want your bike to run and how much weight you’re comfortable adding. I once chose a lead-acid battery because it was cheap, but the bike became hard to handle. Switching to a lithium-ion battery made a huge difference in performance and ease of use.
Safety Tips
Safety should never be an afterthought when handling batteries. Here are some crucial tips to keep in mind:
- Always use a charger designed for your battery type to avoid overcharging or overheating.
- Install the battery in a secure, well-ventilated spot to prevent damage from bumps and heat.
- Check connections regularly for corrosion or loose wires to avoid short circuits.
- Wear protective gloves and glasses when working with batteries to prevent injury from leaks or sparks.
- Dispose of old batteries responsibly—never throw them in the trash.
Have you thought about what could happen if your battery overheats while your child is riding? Taking these safety steps helps prevent accidents and keeps your electric toy bike reliable and fun to use.
Wiring And Electrical Setup
Setting up the wiring and electrical components is crucial for your electric toy bike. This stage ensures your bike runs smoothly and efficiently. Proper connections prevent short circuits and enhance performance.
Connecting The Motor And Battery
First, gather your motor, battery, and necessary wires. Make sure the battery is fully charged. Connect the red wire from the motor to the positive terminal of the battery. Attach the black wire from the motor to the negative terminal. Secure all connections tightly to avoid loose ends. Use electrical tape to insulate exposed wires. This prevents any accidental short circuits.
Installing The Controller
Next, integrate the controller into the system. The controller modulates the power from the battery to the motor. Connect the controller’s power input wires to the battery. Ensure these connections are firm and secure. Then, attach the controller’s output wires to the motor. This setup allows you to manage speed and direction. Finally, fix the controller in a safe spot on the bike. Use zip ties or mounting brackets for stability. This ensures the controller stays in place during rides.
Adding Controls And Safety Features
Adding controls and safety features to your electric toy bike is essential for a fun and secure ride. These elements help you manage speed, stop effectively, and protect the rider from accidents. Let’s break down the key parts you need to focus on to make your bike both easy to use and safe.
Throttle And Brakes
The throttle controls how fast your electric toy bike goes. You can add a simple twist or thumb throttle on the handlebar for easy speed control. Make sure the throttle is smooth and responsive to avoid sudden bursts of speed that might surprise the rider.
Brakes are just as important as the throttle. You can use small hand brakes similar to those on a bicycle or even a foot brake on the rear wheel. Testing the brakes several times before riding is a smart move to ensure they stop the bike quickly and safely.
Have you thought about how the throttle and brakes will work together? A well-balanced setup means the rider can speed up and slow down smoothly, which reduces accidents.
Safety Gear
Safety gear is your bike’s best friend. Always recommend a helmet for the rider, as it protects the head in case of falls. Adding knee and elbow pads gives extra protection during minor scrapes or crashes.
Reflective stickers or lights on the bike increase visibility, especially if the rider uses it near streets or in dim light. You might also want to add a bell or horn so the rider can alert others when approaching.
Think about the last time you saw a kid on a toy bike without any safety gear—did it make you nervous? Your job is to make sure your bike doesn’t cause that worry for anyone watching.
Testing And Troubleshooting
Testing and troubleshooting are key to ensure your electric toy bike runs smoothly. Checking every part helps catch small problems early. This saves time and prevents bigger issues later.
Careful testing gives you confidence the bike is safe and fun. Troubleshooting guides you through fixing common faults quickly. Both steps improve the bike’s performance and lifespan.
Initial Test Ride
Start with a slow and careful test ride in a safe area. Check how the bike starts and stops. Listen for unusual sounds from the motor or wheels. Feel if the brakes work well and the steering is smooth.
Watch the battery level during the ride. Make sure it holds power and charges correctly. Test the speed control to see if it changes smoothly. Take note of any vibrations or strange behavior.
Common Issues And Fixes
- Bike won’t start:Check the battery connection and switch. Replace or recharge the battery if needed.
- Motor is noisy:Tighten loose screws. Clean dirt or debris around the motor.
- Brakes feel weak:Adjust brake cables or pads. Replace worn brake parts.
- Speed control not working:Inspect the throttle wire and connection. Repair or replace damaged parts.
- Battery drains quickly:Avoid overcharging. Use the correct charger and check battery health.

Credit: www.youtube.com
Customization Ideas
Personalize an electric toy bike by choosing bright colors and adding stickers. Modify handlebars and seats for comfort and style. Simple changes make the bike unique and fun to ride.
Customization breathes life into your electric toy bike. It allows for a personal touch and uniqueness. Whether it’s a splash of color or a cool accessory, customization enhances the fun. Dive into these creative ideas to elevate your electric toy bike.Paint And Design
A fresh coat of paint can transform your bike. Choose vibrant colors for a lively look. Opt for cool patterns like stripes or polka dots. Use stencils to make designs easy. Consider glow-in-the-dark paint for night rides. Personalized decals can add a special touch. Names or favorite characters work well. Ensure the paint is safe for kids and weather-resistant.Additional Accessories
Accessories add functionality and style. Attach a basket for carrying toys or snacks. Add a bell for a classic touch. Install LED lights for a modern look. A rearview mirror can enhance safety. Consider streamers for the handlebars. They add a fun, playful feel. Reflective stickers increase visibility at night. Choose accessories that are easy to attach and remove. Always ensure they are safe for children.
Credit: www.youtube.com
Frequently Asked Questions
How Long Does It Take To Build An Electric Toy Bike?
Building an electric toy bike usually takes 4 to 6 hours. This depends on your skill level and the complexity of the design. Proper preparation and clear instructions speed up the process. Patience and careful assembly ensure a safe, functional toy bike.
What Materials Are Needed For An Electric Toy Bike?
You need a small electric motor, rechargeable battery, wheels, frame, and wiring. Additional items include a throttle, switches, and safety gear. Use lightweight, durable materials to ensure safety and efficiency. Quality components improve performance and battery life.
Can Kids Safely Use An Electric Toy Bike?
Yes, with adult supervision and proper safety gear, kids can safely use it. Ensure the bike speed suits the child’s age and skill. Always check the bike for loose parts before use. Teach kids safe riding habits to prevent accidents.
How Much Does It Cost To Make An Electric Toy Bike?
Costs vary but typically range from $50 to $150. Expenses depend on motor quality, battery type, and additional features. DIY kits may reduce costs and simplify assembly. Budget for maintenance and replacement parts over time.
Conclusion
Building an electric toy bike can be fun and rewarding. Follow the steps carefully and use safe materials. Test the bike often to ensure it works well. Kids will enjoy riding a bike you made yourself. Keep learning and trying new ideas to improve your skills.
Making toys teaches creativity and problem-solving. Start small, be patient, and enjoy the process. Your electric toy bike will bring joy and pride. Keep creating and exploring new projects.