






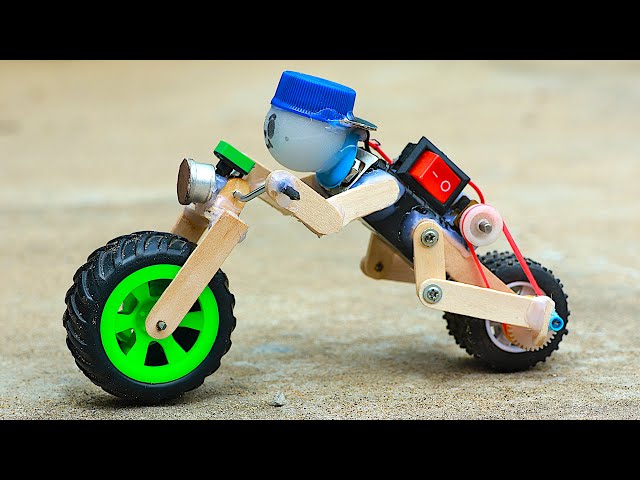
Have you ever wanted to create something fun and exciting with your own hands? Making a toy bike at home is easier than you think, and it’s a fantastic way to bring your creativity to life.
Imagine the pride you’ll feel showing off a toy bike you built yourself. Whether you want a special gift or a cool project to enjoy, this guide will walk you through every step. Keep reading, and you’ll discover simple materials and easy instructions that turn your idea into a real, working toy bike.
Ready to start building? Let’s dive in!
Materials Needed
Gathering the right materials is crucial before you start making a toy bike at home. The quality and type of materials you choose will affect both the look and durability of your finished bike. Think about what you already have at home and what you might need to buy to keep things simple and budget-friendly.
Frame And Structure Materials
The frame is the backbone of your toy bike. You can use lightweight wood like popsicle sticks or small dowels for a sturdy yet manageable frame. Cardboard is also a good option if you want something easy to cut and shape, but it may need reinforcement for strength.
Wheels And Axles
Wheels need to spin smoothly, so look for round objects like bottle caps, old toy wheels, or even CDs. Axles can be made from skewers, straws, or thin metal rods. Make sure the wheels fit well on the axles to allow easy movement without wobbling.
Fasteners And Adhesives
How will you hold everything together? Hot glue is quick and strong, but if you want a cleaner finish, try wood glue or craft glue. Small nails, pins, or string can also help secure parts, especially if you want to avoid glue mess.
Decorative Elements
Adding color and style is part of the fun. Use markers, paint, stickers, or washi tape to make your toy bike unique. Think about how you want your bike to look—sleek and simple or bright and flashy?
Tools You’ll Need
Basic tools like scissors, a craft knife, and a ruler are essential. If you’re working with wood, a small saw or sanding paper might be useful. Having everything ready makes the building process smoother and more enjoyable.
What materials do you already have around the house that could work? Sometimes the best projects come from simple, everyday items waiting to be transformed.
Choosing The Right Design
Choosing the right design for your toy bike is crucial. It sets the foundation for how fun and functional your creation will be. A well-thought-out design matches your skill level, the materials you have, and the age of the child who will use it.
Consider The Age And Size Of The User
Your toy bike should fit the child comfortably. Too big, and it becomes unsafe; too small, and it won’t be enjoyable. Think about the height and strength of the child to decide the bike’s size and structure.
For toddlers, simple designs with fewer moving parts work best. Older kids can handle more complex models with pedals and steering features.
Choose Between Realistic And Creative Styles
Do you want the bike to look like a real motorcycle or a fun, imaginative ride? Realistic designs often require more precision and detailed parts. Creative styles allow you to experiment with shapes and colors, making the project more playful.
When I made a toy bike for my nephew, I chose a colorful, cartoonish look. It made the project easier and sparked his imagination while playing.
Material Availability And Durability
Think about what materials you can easily get at home or in local stores. Wood, plastic, and metal each have different strengths and challenges. Wood is easy to shape but might not last as long outdoors.
Durability matters if the bike will be used often. If you expect rough play, choose stronger materials and a sturdy design. What materials do you already have on hand that could make your design practical and fun?
Balance Between Simplicity And Functionality
A simple design is easier to build and repair. However, adding functional elements like pedals or a small basket can make the toy more exciting. Decide which features are must-haves and which can be skipped without losing the bike’s charm.
Think about how much time and effort you want to put into the project. Sometimes, a straightforward design brings more joy because it’s ready to ride sooner.
Building The Frame
Building the frame is the most important part of making a toy bike at home. The frame holds all parts together and gives the bike its shape. A strong frame keeps the bike steady and safe for play. Use simple tools and materials found around the house. Follow clear steps to create a solid frame that lasts.
Choosing The Right Materials
Start by selecting lightweight and sturdy materials. Wood sticks, plastic tubes, or thin metal rods work well. Avoid materials that are too heavy or fragile. The frame needs to support the wheels and seat without bending.
Measuring And Cutting The Pieces
Measure the size of the bike frame carefully. Use a ruler or tape measure for accuracy. Mark the cuts clearly before cutting the materials. Cut the pieces with scissors, a saw, or cutters depending on the material. Keep the edges smooth to avoid injury.
Assembling The Frame
Lay out all pieces on a flat surface. Join the parts using glue, nails, or screws. Make sure the joints are tight and secure. Double-check the shape to match a real bike frame. Let the glue dry completely before moving on.
Reinforcing The Frame For Durability
Add extra support to weak points with small braces or tape. Reinforce corners and joints to prevent wobbling. Test the frame by gently pressing on different areas. Fix any loose parts before attaching wheels and other parts.

Credit: www.youtube.com
Crafting The Wheels
Crafting the wheels is a key part of making a toy bike at home. Wheels must be sturdy and balanced for smooth movement. Choosing the right materials and shaping them carefully helps create strong wheels. The size and symmetry also affect how well the toy bike rolls. This section breaks down the process into simple, clear steps to help you make perfect wheels.
Choosing The Right Material For Wheels
Select materials that are lightweight but strong. Common options include cardboard, plastic bottle caps, or wood slices. Cardboard is easy to cut and shape. Plastic caps are already round and durable. Wood slices provide a natural look and firmness. Pick a material that fits your tools and skills.
Cutting The Wheels To Size
Measure the wheel size before cutting to keep all wheels equal. Use a compass or a round object as a guide. Carefully cut the shape with scissors or a craft knife. Smooth the edges with sandpaper or a nail file. Smooth edges prevent the wheels from catching or wobbling.
Creating The Wheel Axle Hole
Make a small, centered hole in each wheel for the axle. Use a sharp tool like a needle or drill to create the hole. The hole size must match the axle thickness for a tight fit. A loose hole causes wheels to fall off or spin unevenly. A tight hole keeps wheels stable and rolling smoothly.
Adding Grip To The Wheels
To improve traction, add grip to the wheel surface. Wrap rubber bands around the wheel edges. Use textured tape or glue on sandpaper strips. Grip helps the toy bike move steadily on different surfaces. It also makes the bike safer for play.
Assembling The Bike
Assembling the toy bike is an exciting part of the project. It brings all the pieces together into a fun, working model. Focus on fitting each part carefully. Take your time to make sure everything fits well. This will help the bike look good and work smoothly.
Gathering The Tools And Parts
Collect all the parts needed for the bike. Check the frame, wheels, handlebars, and seat. Prepare basic tools like glue, tape, scissors, and a small screwdriver. Having everything ready saves time and reduces frustration.
Connecting The Frame Pieces
Start with the main frame of the bike. Fit the front and back parts together. Use glue or tape to hold them firmly. Make sure the frame is straight and stable before moving on.
Attaching The Wheels
Fix the wheels to the frame carefully. Insert the axles through the wheel holes. Secure them tightly to avoid wobbling. The wheels should spin freely without falling off.
Installing The Handlebars And Seat
Attach the handlebars to the front of the frame. Use glue or tape to keep them steady. Fix the seat on top of the frame in the right position. Check that both parts are strong and well balanced.
Final Adjustments And Checks
Look over the bike for any loose parts. Tighten or re-glue where needed. Test the bike by rolling it on a flat surface. Make sure it moves smoothly and looks neat.

Credit: www.youtube.com
Adding Decorative Elements
Decorative elements bring charm and personality to your toy bike. Use colorful stickers, paint, or small accessories to make it stand out. Simple touches can turn a plain bike into a fun, eye-catching creation.
Adding decorative elements to your homemade toy bike can turn a simple project into a work of art. This is where you can really let your creativity shine. With a few simple materials, you can personalize the bike, making it unique and special.Choosing Your Color Palette
Consider the colors you want to use. Do you want something vibrant and eye-catching, or are you aiming for a more subtle and classic look? Think about the recipient’s favorite colors and try to incorporate them. A well-chosen color scheme can make your toy bike stand out.Using Stickers And Decals
Stickers and decals are an easy way to add personality. Choose themes that resonate with the child, such as animals, superheroes, or flowers. Apply them strategically on the frame and wheels to create a cohesive look. Make sure the surfaces are clean and dry for the best adhesion.Adding Textures With Craft Materials
Use craft materials like felt, foam, or glitter to add texture. Cut shapes or patterns and attach them to the bike using glue. Consider creating handlebars with colorful yarn or ribbons for a tactile experience. This not only enhances the bike’s appearance but also offers sensory stimulation.Personalizing With Names Or Initials
Adding a name or initials can make the toy bike feel truly special. Use paint pens or letter stickers to add the child’s name to the frame. This personal touch makes the bike a cherished item and gives it a sense of ownership.Reflective Elements For Safety
Safety can be stylish too. Consider adding reflective tape or stickers to the toy bike. These elements not only look cool but also increase visibility if the child rides the bike outdoors. It’s a practical addition that parents will appreciate. As you embellish your toy bike, think about the joy it will bring to its rider. What decorations will make their eyes light up? By putting thought into these details, you create more than just a toy — you craft a memorable experience.Safety Tips For Kids
Creating a toy bike at home can be fun and safe with simple tools and adult help. Always check materials for sharp edges and use non-toxic paint. Supervise children closely to prevent accidents while building and playing.
When crafting a toy bike at home, safety is key. Ensuring children are safe enhances their play experience. It’s important to teach kids how to handle their toy bike with care. Here are some tips to keep in mind.1. Use Child-safe Materials
Choose non-toxic and sturdy materials. Avoid sharp edges or small parts. These can pose choking hazards.2. Supervise Assembly
Always supervise when kids assemble their toy bikes. This prevents mishaps and ensures proper construction.3. Ensure Proper Balance
Make sure the bike is balanced. A wobbly bike can cause falls and injuries.4. Inspect Before Use
Check the toy bike for any loose parts. Tighten screws and secure connections regularly.5. Teach Safe Riding Practices
Show kids how to ride safely. Encourage them to avoid rough play and uneven surfaces.6. Create A Safe Play Area
Designate a safe, flat area for bike play. Avoid areas with traffic or obstacles.7. Wear Protective Gear
Encourage wearing helmets and knee pads. They protect against minor scrapes and bumps.8. Establish Rules
Set clear rules for playtime. This includes taking turns and not pushing or shoving.9. Regular Maintenance Checks
Perform regular checks on the bike. Ensure all parts are functioning well.10. Educate On Potential Hazards
Explain potential dangers to children. This helps them understand the importance of safety.Fun Riding Ideas
Making a toy bike at home is just the start of the adventure. The real fun begins when you bring your creation to life with exciting riding ideas. These ideas can turn a simple ride into an engaging playtime experience for kids and adults alike.
Creative Obstacle Courses
Set up a small obstacle course in your backyard or living room using cushions, boxes, and cones. This challenges riders to steer carefully and improve their balance. It’s a great way to make riding the toy bike more interactive and skill-building.
Timed Races With Friends
Invite friends or family members to join in a friendly race. Use a stopwatch to time each lap and see who completes the course fastest. This encourages healthy competition and adds excitement to your bike rides.
Story-based Adventures
Create a story where the bike is part of a mission, like delivering a secret message or rescuing a toy pet. This approach sparks imagination and makes riding more meaningful. What kind of adventure will your toy bike take you on today?
Decorate And Customize Your Ride
Add stickers, paint, or small accessories to personalize your toy bike. Customizing makes the bike feel special and encourages pride in your handiwork. How would you make your toy bike stand out from the rest?
Exploring New Terrains
Take your toy bike to different surfaces like grass, sand, or wooden floors. Each terrain offers unique challenges and sensations. This keeps riding fresh and tests your bike’s versatility.

Credit: www.youtube.com
Frequently Asked Questions
What Materials Are Needed To Make A Toy Bike At Home?
You need cardboard, scissors, glue, paint, and small wheels. These basic materials are easy to find and safe for kids. Using recycled items makes the project eco-friendly and budget-friendly.
How Long Does It Take To Build A Toy Bike?
Building a toy bike usually takes 1 to 2 hours. Time depends on the design complexity and drying time for glue or paint. Simple models can be finished quickly, making it a fun weekend craft.
Can Kids Safely Make A Toy Bike At Home?
Yes, kids can safely make a toy bike with adult supervision. Using child-safe glue and blunt scissors ensures safety. This activity enhances creativity and motor skills while being enjoyable.
How To Customize A Homemade Toy Bike Design?
Customize by painting different colors, adding stickers, or using unique materials. Personal touches make the toy bike special and encourage imaginative play. Experiment with shapes and decorations for a unique look.
Conclusion
Making a toy bike at home can be fun and rewarding. It helps develop creativity and basic skills. You only need simple materials and some patience. Each step adds to the final result. Kids and adults can enjoy this project together.
It also saves money compared to buying toys. Try making different designs to keep it interesting. This activity offers learning and joy at the same time. Give it a try and see the smile it brings!