






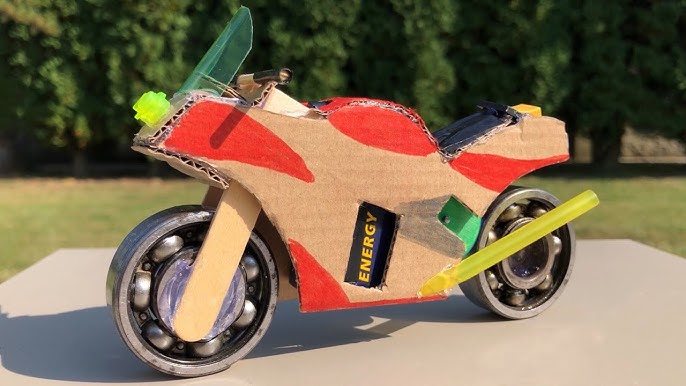
Have you ever wanted to create something fun and unique with your own hands? Making a toy bike with cardboard is a simple and exciting project you can do right at home.
Not only will you save money, but you’ll also enjoy the satisfaction of building a cool toy that you can proudly show off. In this guide, you’ll find easy steps and handy tips to turn plain cardboard into a fantastic toy bike.
Ready to get creative and have some fun? Let’s dive in!
Materials Needed
Gathering the right materials is the first exciting step to creating your own cardboard toy bike. The quality and type of materials you choose will affect how sturdy and fun your bike turns out. It’s a good idea to have everything ready before you start building to keep your momentum going.
Cardboard
Choose thick, durable cardboard like from shipping boxes or packaging. Thin cardboard won’t hold up well when you cut and assemble it into bike parts. If you can, pick pieces that are large enough to cut multiple sections from, so you don’t have to patch smaller scraps together.
Cutting Tools
You’ll need a sharp utility knife or scissors for precise cuts. A dull blade can tear the cardboard, making your bike look messy and less sturdy. Always cut on a safe surface and take your time to follow the outlines carefully.
Adhesives
Strong glue or double-sided tape works best to hold your bike pieces together. Glue offers a more permanent bond but takes some drying time. Tape is quick and easy but may not be as durable under stress. You might want to use a combination of both for different parts.
Markers And Paints
Decorating your toy bike makes the project more personal and fun. Use markers, colored pencils, or acrylic paint to add details like bike handles, wheels, and logos. Think about how these colors will stand out on your cardboard background.
Additional Supplies
- Ruler or measuring tape – for accurate measurements
- Pencil – for sketching your design before cutting
- Rubber bands or string – useful for making movable parts
- Paper clips or small sticks – can serve as axles or connectors
Do you have some of these materials around your home already? Sometimes, the best projects come from using what’s on hand rather than buying new supplies.
Preparing The Cardboard
Preparing the cardboard is a crucial step before you start crafting your toy bike. The right preparation not only makes cutting and assembling easier but also ensures your bike is sturdy and looks great. Take your time to choose and prepare the cardboard carefully—it will pay off in the final result.
Choosing The Right Cardboard
Not all cardboard is created equal. Thicker corrugated cardboard works best because it can hold shape and support weight without bending too easily.
Look for pieces that are clean and free from tears or stains. Avoid overly thin or flimsy cardboard, as it might not withstand the cutting and gluing process.
Flattening And Cleaning The Cardboard
Cardboard often arrives folded or bent. Flatten it out by placing a heavy book or weight on top for a few hours.
If the surface is dusty or dirty, wipe it gently with a dry cloth. Clean cardboard helps paint and glue stick better, resulting in a neater finish.
Marking And Measuring Accurately
Use a ruler and pencil to draw your bike parts directly on the cardboard. Precision here saves frustration later when parts don’t fit together.
Double-check your measurements and lines before cutting. Small errors can quickly add up and affect the bike’s balance and look.
Cutting The Bike Parts
Cutting the bike parts from cardboard requires patience and precision. Each piece must fit together smoothly to build a sturdy toy bike. Use a sharp craft knife and a cutting mat to get clean edges. Trace the shapes carefully before cutting to avoid mistakes. Prepare all parts in advance for an easier assembly.
Wheels
Start with cutting two large circles for the wheels. Use a round object as a guide for perfect shapes. Cut two smaller circles to place inside the wheels as rims. Make sure the wheels are the same size for balance. Smooth the edges with sandpaper if needed.
Frame
Trace the bike frame shape onto the cardboard. The frame should be a sturdy, connected piece. Cut along the lines slowly to keep straight edges. Check the frame fits well with the wheels and other parts. Reinforce the frame by cutting two identical pieces and gluing them together.
Handlebars
Draw the handlebars with two grips and a connecting bar. Keep the handles wide enough for easy holding. Cut carefully to keep the shape clean and even. Attach a small piece at the center to connect the handlebars to the frame. Make the handlebars strong by doubling the cardboard layers.
Seat
Cut a small rectangular piece for the seat base. Shape the top part to be comfortable and smooth. Add a thin strip below the seat to act as the seat post. Make sure the seat fits well on the frame. Use extra cardboard to strengthen the seat for durability.

Credit: www.youtube.com
Assembling The Frame
Assembling the frame is a key part of making your toy bike from cardboard. The frame holds all parts together. It must be strong and steady. Use sturdy cardboard to ensure durability. Cut each piece carefully for a perfect fit. Measure twice, cut once to avoid mistakes.
Begin by laying out all frame pieces. Organize them by size and shape. This helps during assembly and speeds up the process. Keep glue or tape ready. These will secure the parts firmly.
Cutting And Preparing Cardboard Pieces
Use a ruler and pencil to mark the cardboard. Draw clear straight lines for cutting. Use a sharp craft knife for clean edges. Avoid tearing or bending the cardboard. Cut out all frame parts before gluing.
Joining Frame Parts Securely
Align the pieces carefully before joining. Use strong glue for long-lasting hold. Apply glue evenly along edges. Press parts together firmly and hold for a minute. Use tape to reinforce joints for extra strength.
Reinforcing The Frame Structure
- Add extra strips of cardboard inside corners.
- Use small cardboard triangles at joints.
- Layer cardboard pieces to increase thickness.
- Check for any weak spots and reinforce them.
Attaching The Wheels
Attach the wheels by carefully sliding them onto the cardboard axles. Ensure they spin freely for smooth movement. Secure with glue or tape to keep wheels in place.
Attaching the wheels to your cardboard toy bike is where the magic truly starts to happen. This step brings your creation to life, transforming a simple cardboard cutout into a moving object. It’s an exciting phase that requires a bit of precision and a touch of creativity to ensure the wheels not only fit but also turn smoothly.Creating The Wheel Axles
Begin by cutting two thin strips of cardboard to serve as axles for your wheels. These should be slightly longer than the width of your bike frame. Roll each strip tightly and secure them with glue to form sturdy rods.Positioning The Wheels
Decide where you want your wheels to be placed on the bike frame. Typically, you’d place one at the front and the other at the back, aligning them with the bike’s body. Mark these spots carefully to ensure balance and symmetry. Poke holes in the center of each wheel and slide them onto the axles you’ve created. Use glue to secure them, ensuring they can still spin freely. You might need to adjust the tightness, so they rotate without wobbling.Securing The Axles
Attach the axles to the bike frame by inserting them through pre-made holes. Use glue to hold them in place, but be careful not to obstruct the wheels’ movement. Test the wheels to make sure they turn smoothly without resistance.Final Adjustments
Once everything is in place, give your toy bike a test run. Roll it on a flat surface to ensure the wheels are aligned correctly and move without any hindrance. If you notice any imbalance, adjust the positioning or tightening of the wheels. Crafting a toy bike from cardboard may seem like a daunting task at first. However, the joy of seeing those wheels spin is worth every moment spent on this creative project. Are you ready to see your cardboard creation come to life?
Credit: www.youtube.com
Adding Handlebars And Seat
Adding handlebars and a seat brings your cardboard bike to life. These parts make the bike look real and fun to play with. Use simple materials and careful cuts to create strong, neat shapes. Attach each part firmly to keep the bike steady and safe for play.
Creating The Handlebars
Start by cutting a long strip of cardboard for the handlebar base. Fold it gently to form a curved shape that fits in your hands. Add smaller pieces on each end to act as grips. Use glue or tape to hold the shape firmly. Make sure the handlebars are wide enough for easy holding.
Making The Seat
Cut a small rectangular piece for the seat base. Layer a few cardboard pieces on top to add thickness and comfort. Shape the edges by trimming them softly to look like a bike seat. Attach the seat to the bike frame using strong glue or tape. Position it so it balances well with the handlebars.
Attaching Handlebars And Seat To The Frame
Find the right spots on the bike frame for the handlebars and seat. Use glue or tape to fix the handlebars firmly at the front. Attach the seat in the middle or back of the frame. Hold each part in place for a few minutes to ensure a strong bond. Check stability by gently moving the parts after they dry.
Decorating Your Toy Bike
Decorating your toy bike is where creativity truly shines. This step lets you add personality and make your bike unique. It’s a chance to transform simple cardboard into something vibrant and fun.
Choosing The Right Colors
Start by picking colors that you love or that match a theme. Bright colors like red, blue, or yellow can make your bike stand out. You might want to use markers, paint, or colored paper to bring your bike to life.
Think about what mood you want your bike to express. Do you want it to look sporty, classic, or playful? Your color choice sets the tone.
Adding Details With Markers And Paint
Use markers or paint to add lines, patterns, or even your name on the bike frame. Thin black lines can simulate metal parts or tires. You can also add fun designs like flames or stars.
Try layering colors carefully to avoid smudging. Let each layer dry before adding more details. This keeps your design sharp and clean.
Using Stickers And Decorative Tape
Stickers and decorative tape are quick ways to add flair without much mess. You can find bike-themed stickers or create your own from paper. Tape with patterns like stripes or polka dots can highlight certain parts, such as the handlebars or seat.
Have you ever thought about combining textures? Mixing smooth paint with textured tape can make your toy bike more interesting to touch and look at.
Personal Touches And Embellishments
Small additions like buttons, beads, or yarn can make your bike special. For example, using yarn for bike handles gives a cozy feel. You could glue tiny paper flowers or stars to decorate the wheels.
Don’t hesitate to experiment with different materials. Your bike’s decoration is a reflection of you—make it as unique as your own style.

Credit: www.youtube.com
Tips For Durability
Creating a toy bike with cardboard can be a fun activity. Ensuring the bike’s durability is key to long-lasting enjoyment. Here are some tips to make your cardboard bike sturdy and reliable.
Choose The Right Cardboard
Select strong, thick cardboard for your toy bike. Avoid flimsy or thin materials. Corrugated cardboard works best. It provides the necessary strength and support.
Reinforce Weak Spots
Identify areas that might bend or break. Use extra layers of cardboard there. Add reinforcing strips to the frame and wheels. This strengthens the structure.
Use Quality Adhesives
Opt for strong glue or adhesive tape. Ensure all joints are secure and stable. Hot glue is an excellent choice for quick bonding.
Seal With Varnish Or Paint
Protect the cardboard from moisture and wear. Apply a coat of varnish or paint. This adds durability and improves appearance.
Consider External Supports
Include additional supports for extra stability. Wooden dowels or sticks can add strength. They help maintain the bike’s shape over time.
Frequently Asked Questions
How Do I Start Making A Cardboard Toy Bike?
Begin by gathering cardboard, scissors, glue, and a pencil. Draw the bike parts on cardboard, cut them carefully, and assemble with glue.
What Materials Are Needed For A Cardboard Toy Bike?
You need thick cardboard, scissors, glue, paint, markers, and a ruler for precise measurements and decoration.
How Can I Make The Cardboard Bike Wheels Sturdy?
Use multiple cardboard layers glued together for strength. Reinforce with a circular cutout inside for better support.
How Long Does It Take To Make A Toy Bike From Cardboard?
It usually takes 1-2 hours depending on your crafting skill and the complexity of the bike design.
Conclusion
Building a toy bike with cardboard is fun and simple. It lets you use your hands and think creatively. The steps are clear and easy to follow. You can enjoy making something unique and useful. This project also helps you learn about shapes and balance.
Kids and adults will find joy in crafting together. Try it today and see how much fun you can have!