






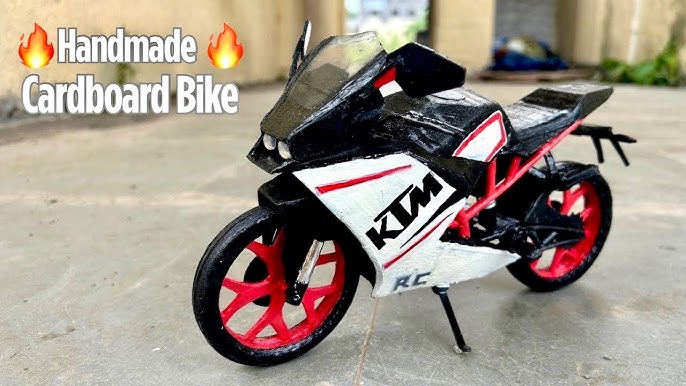
Are you ready to bring your creativity to life and build something exciting with your own hands? Making a toy KTM bike is not only fun but also a great way to learn new skills and impress your friends.
Imagine holding a cool, miniature version of your favorite bike, crafted by you! In this guide, you’ll discover simple steps and tips that make the process easy and enjoyable. Stick with me, and by the end, you’ll have your very own toy KTM bike to show off.
Let’s get started!

Credit: www.youtube.com
Materials Needed
Gathering the right materials is key to making a toy KTM bike. The supplies must be easy to find and safe to use. Start with basic tools and materials for the bike’s structure. Then, use extra items for decoration to make it look real and fun.
Basic Supplies
- Cardboard or sturdy paper for the bike frame
- Scissors or a craft knife for cutting shapes
- Glue or tape to hold pieces together
- Markers or paint for coloring
- Ruler to measure parts accurately
- Pencil for drawing outlines
- String or thin wire for handles and details
Optional Decorative Items
- Stickers or printed KTM logos for authenticity
- Small plastic wheels or bottle caps for tires
- Colored paper for extra details
- Glossy finish spray or clear tape to protect colors
- Foam sheets for added texture and 3D parts
Choosing The Right Design
Choosing the right design is key when making a toy KTM bike. The design sets the foundation for your project. A good design matches your skills and the materials you have. It makes the building process easier and more fun. Picking the right style also helps your toy look better and last longer.
Simple Shapes For Beginners
Start with simple shapes like rectangles, circles, and triangles. These shapes are easier to cut and assemble. They reduce mistakes and save time. Simple designs help you focus on learning basic techniques. You can add details later as you improve your skills.
Using Templates
Templates give you a clear guide to follow. They show exact shapes and sizes for each part. Templates reduce guesswork and errors. You can print or draw templates on paper or cardboard. Use them to trace parts on your materials before cutting. This helps keep your toy bike neat and accurate.
Cutting And Shaping
Cutting and shaping are crucial steps in crafting your toy KTM bike. These actions define the bike’s overall look and ensure all parts fit perfectly together. Taking your time here will make assembling easier and your final model more impressive.
Safe Cutting Techniques
Safety should be your top priority whenever you handle sharp tools. Always wear protective gloves and safety goggles to prevent accidents. A stable workspace with good lighting helps you maintain control over your cuts.
Use a fine-toothed saw or a craft knife for precise cuts. Avoid rushing—slow, steady movements reduce the risk of slips. If you’re cutting plastic or thin wood, try scoring the surface first before applying more pressure to break it cleanly.
Have you checked if your cutting tools are sharp? Dull blades can cause jagged edges and increase the chance of injury. Keep your blades fresh by regularly replacing or sharpening them.
Shaping The Bike Frame
Once you have your rough pieces cut out, shaping begins. Sandpaper is your best friend here—start with a coarse grit to remove large bumps, then move to finer grit for smooth finishes. This layering approach prevents over-sanding and helps maintain the frame’s shape.
Pay attention to the bike’s curves and angles. Use files or small rasps to refine tight spots like the handlebar mounts or seat area. Test fit parts frequently; this helps you catch any adjustments needed before final assembly.
Have you tried using a template or stencil for the frame? It keeps your shapes consistent and professional-looking. Don’t hesitate to make small tweaks—perfect shaping takes patience and a keen eye.

Credit: www.amazon.com
Assembling The Parts
Assembling the parts is the exciting phase where your toy KTM bike starts to take shape. Careful handling ensures each piece fits well and the bike looks just right. Take your time and follow the steps clearly.
Attaching Wheels
Begin by fixing the wheels to the frame. Align the wheel axle with the slots on the frame. Slide the axle gently into place without forcing it. Secure the wheels using small screws or clips provided.
Check that the wheels spin freely and stay attached firmly. Loose wheels can cause the bike to wobble or fall apart easily. Tighten screws just enough to hold the wheels steady.
Joining The Frame Components
Next, connect the main frame parts. Match the holes on each piece carefully. Insert small pins or screws to join them together. Make sure the frame is straight and solid.
Press parts firmly but avoid breaking delicate pieces. A sturdy frame supports the bike’s shape and balance. Double-check all connections before moving on to other details.
Painting And Decorating
Create a toy KTM bike using simple materials and bright paint for a fun, colorful look. Focus on neat decorating to bring the model to life. Small brushes help add detailed designs easily.
Painting and decorating your toy KTM bike is where the magic happens. It’s your chance to infuse personality and style into your creation. Whether you’re aiming for a realistic replica or a wild, imaginative design, this stage allows you to bring your vision to life.Color Choices
Choosing the right colors can set the tone for your bike. Bright oranges and blacks are classic for a KTM look. Consider using metallic paints for a sleek finish or matte for a more rugged appearance. Don’t be afraid to experiment with unconventional colors. A splash of neon or pastel can make your bike stand out. Think about what reflects your personality and let that guide your choices.Adding Details
Details make the difference between a basic model and a masterpiece. Use fine brushes to add intricate designs like logos or stripes. Decals can also add professional-looking details with minimal effort. Consider textures to add depth. You can use sandpaper to create a worn look or gloss for a shiny effect. Details such as bolts, screws, or even tiny stickers can bring your toy bike to life. What story will your bike tell? With a little creativity and attention to detail, you can create a unique piece that reflects your style.Final Touches
Adding the final touches to your toy KTM bike transforms it from a simple craft into a durable and personalized masterpiece. These last steps ensure your bike is not only visually appealing but also sturdy enough to handle playtime. Paying attention to details now can save you from future repairs and enhance your overall satisfaction with the project.
Checking Stability
Before you call your toy KTM bike complete, test its stability carefully. Place it on a flat surface and gently push it to see if it wobbles or tips easily. If it feels unsteady, reinforce weak joints with extra glue or small screws to secure parts firmly.
Check the wheels to ensure they spin smoothly without wobbling. Sometimes tightening the axles just a bit can make a big difference in how steady your bike rides. You want a toy that can withstand a few rough rides, not one that falls apart at the first push.
Personalizing Your Bike
Now that your toy bike is stable, make it truly yours by adding personal touches. Use paint to match your favorite KTM model colors or add stickers and decals for a realistic look. You could even write your name or a cool racing number on the side to make it stand out.
Think about small details that reflect your personality—maybe a tiny flag or custom seat design. These finishing touches not only make your bike unique but also show the pride you put into building it. What small detail will you add that makes your bike unmistakably yours?

Credit: www.youtube.com
Frequently Asked Questions
What Materials Are Needed To Make A Toy Ktm Bike?
You need plastic or wood, paint, glue, small screws, and decals. These materials are easy to find and safe for crafting. Proper tools like scissors and a screwdriver help in assembly. Using quality materials ensures durability and a realistic look for your toy KTM bike.
How Long Does It Take To Build A Toy Ktm Bike?
Building a toy KTM bike typically takes 2 to 4 hours. Time varies based on your skill level and detail complexity. Patience during assembly ensures a better finished product. Taking breaks can improve focus and precision throughout the process.
Can Kids Safely Make A Toy Ktm Bike?
Yes, kids can safely make a toy KTM bike with adult supervision. Use non-toxic materials and child-friendly tools to avoid accidents. Supervision ensures proper handling of small parts and sharp objects. This activity boosts creativity and fine motor skills in children.
What Is The Best Paint For A Toy Ktm Bike?
Acrylic paint is best for a toy KTM bike due to quick drying and vibrant colors. It adheres well to plastic and wood surfaces. Acrylic paint is non-toxic and easy to clean, making it safe for kids. Multiple thin layers provide a smooth and durable finish.
Conclusion
Making a toy KTM bike is fun and simple to do. Follow the steps carefully and take your time. Use the right materials for a strong, nice-looking bike. This project can help improve your skills and creativity. You will enjoy playing with the bike after finishing it.
Keep practicing to make even better models next time. Crafting toys can bring joy and learning together. Give it a try and see how much fun it can be!